Everything You Need to Know to Witness the Incredible Horseshoe Crab Migration


Date Published: Nov. 12th, 2025 | Last Updated: Nov. 12th, 2025
Author: Abby | Category: Travel, USA
Date of travel: June 9-10, 2025

Being veterinarians, Toby and I get super excited about nature and different species of wildlife so of course when I found out about the horseshoe migration in Delaware, we just had to go! Toby had actually never seen a horseshoe crab in person before until last year at the New Jersey Science Centre and it blew his mind (they don’t have them in Australia)! The chance to see thousands of them in their natural habitat was something we just couldn’t pass up.

Horseshoe crabs are an amazing ancient species with fossils dating as far back as 445 million years – predating the dinosaurs! Despite the name, these incredible “living fossils” aren’t actually related to crabs at all! They’re related to the extinct trilobites and more closer related to spiders. They have fascinating anatomy and look unlike anything else on this planet – they kind of remind me of a Pokémon 😅.

When we were planning for our Delaware trip, there was surprisingly very limited information available on seeing the horseshoe crab migration. I thought this would’ve been a big tourist attraction for this amazing once a year event, but apparently not! After scouring the internet, I managed to piece together enough information for our trip and I’m sharing it here with you all!

If you want to learn more about horseshoe crabs, I found this website very helpful and informative in our research and education on the horseshoe crab, I highly recommend checking it out: https://horseshoecrab.org/

What is the Horseshoe Crab Migration?

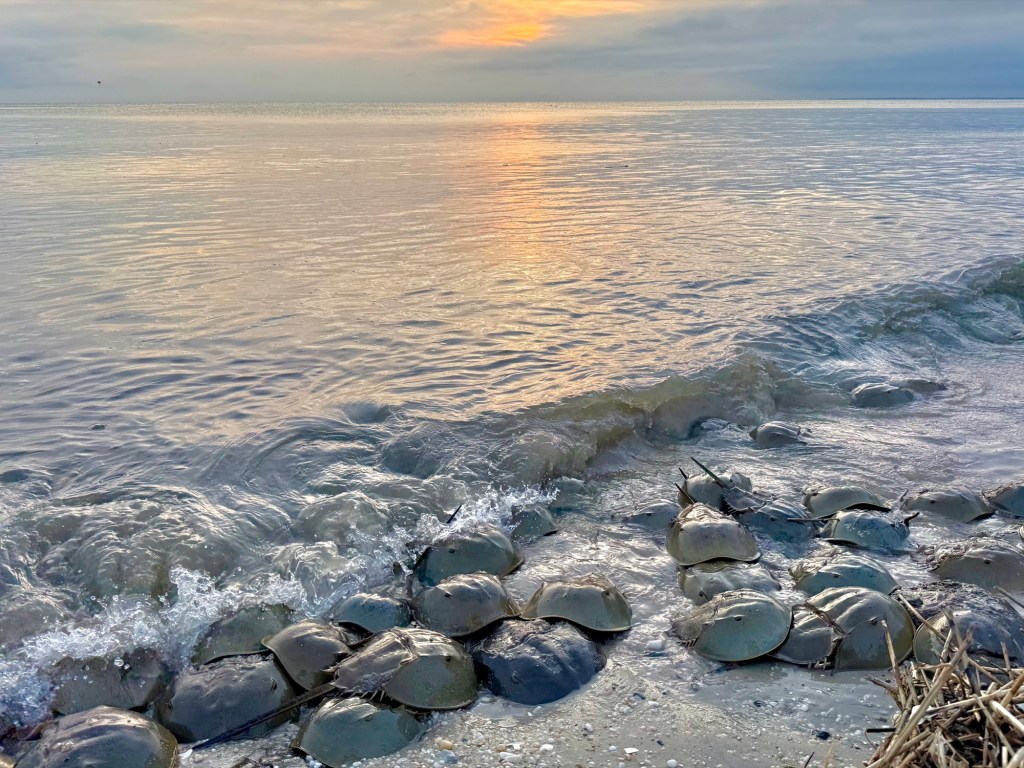
Once a year, millions of horseshoe crabs make the journey from their natural habitat in the deeper ocean to the shallow coastal areas to spawn. This is one of the world’s oldest and largest wildlife migrations – it’s like witnessing a Planet Earth special in real life!

During spawning, the egg-laden females emit pheromones to attract the males and a single male will attach to the back of the female with special clasps. Once attached the pair will make the journey to the shore (pretty much a free piggy-back ride for the male who is usually much smaller in size than the female) where the female will deposit her eggs in the sand and the male will externally fertilize the eggs at the same time she deposits them. Although there can only be one male that attaches, often there are “satellite males” that huddle around one female in hopes of also fertilizing the eggs.

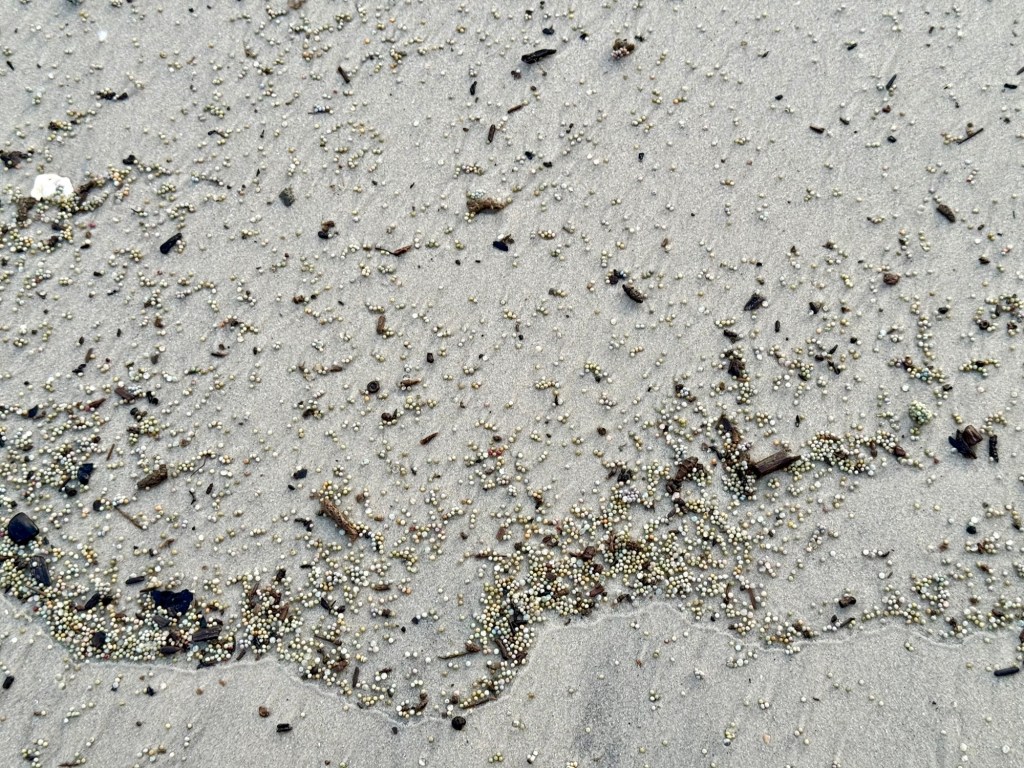
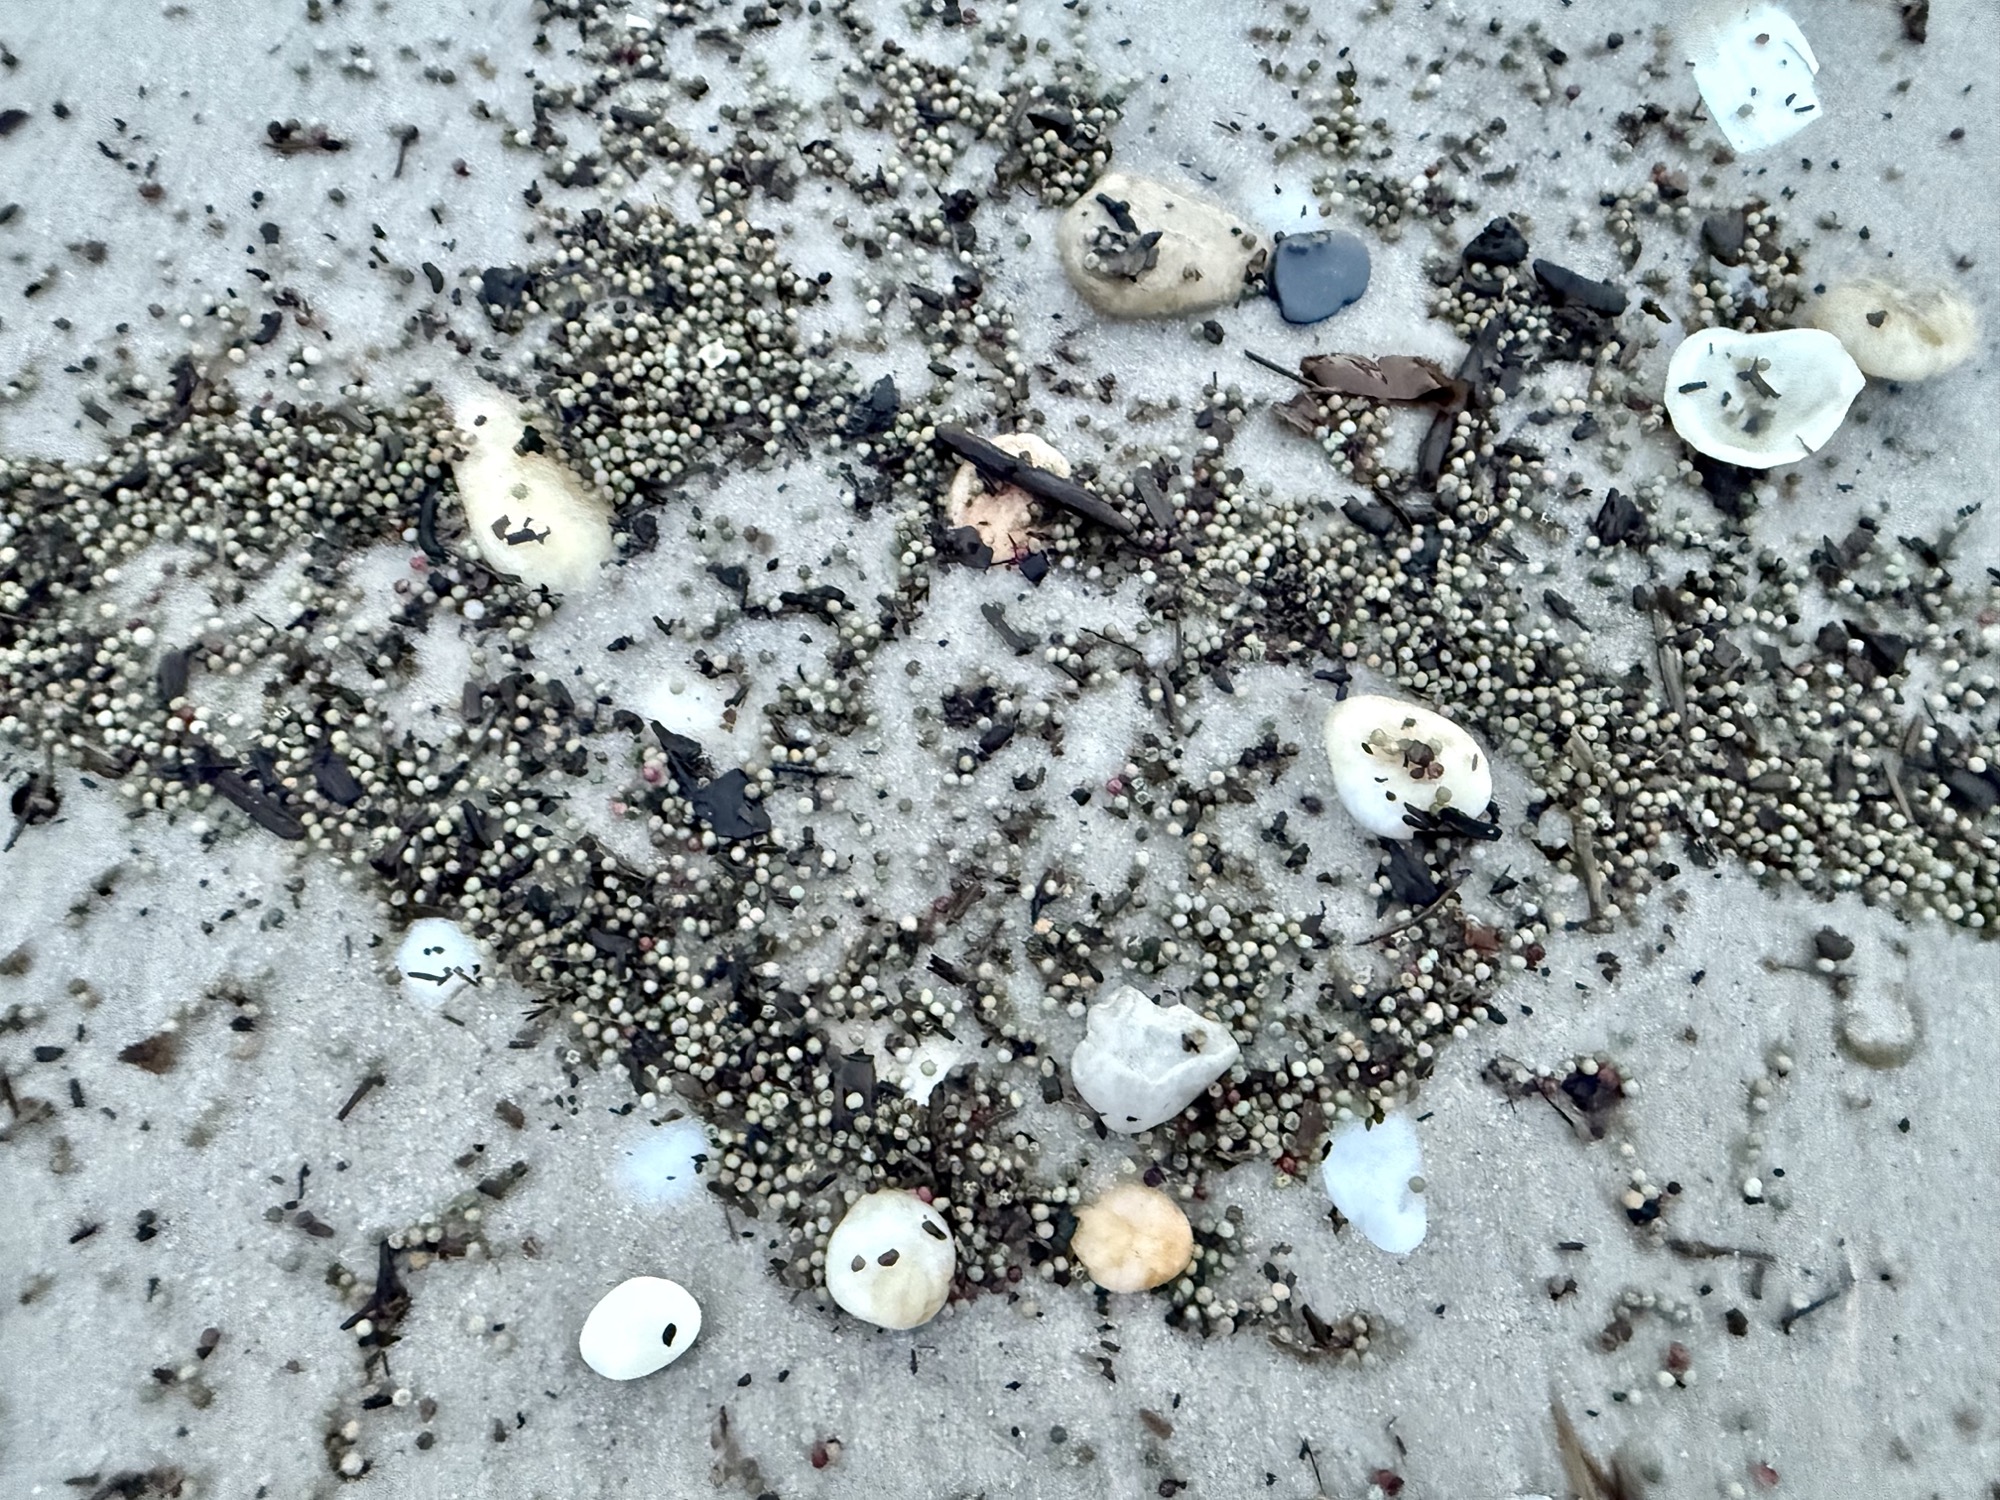
Incredibly, one female can lay 80,000 eggs in one season!!! 🤯🤯🤯 You’ll see millions of little tiny dark green eggs on the shore during the migration. These eggs provide a nutritious source for migratory birds, so you’ll also see tons of signs for migrating birds in the area at the same time.

Look at all the eggs getting washed around the shore! 🤯

Where to see the Horseshoe Crab Migration?

Map of spawning habitats of the Horseshoe Crabs (https://www.horseshoecrab.org/nh/habitat.html)

The Delaware Bay is the most popular place to see the horseshoe crab migration due to its location and protection from large ocean waves as well as sandy beaches. The states of Delaware and New Jersey surrounds the Delaware Bay so you should be be able to see them on either the Delaware side or the New Jersey side. Luckily there is a ferry that connects Lewes/Cape Henlopen and Cape May so you can check out both sides if you have the time (trip takes 1.5 hours one-way)! We had better luck on the New Jersey side this year but we were also two days away from the full moon on the Delaware side and only one day away from the full moon on the Jersey.

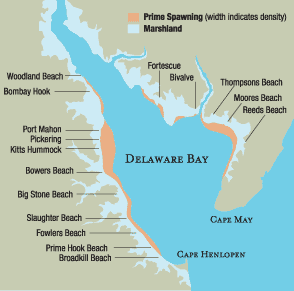
Selection of the perfect spawning site can depend on a number of factors including how coarse or fine the sand is, how quickly the sand drains, sediment of the beach…etc. The most preferred sites are usually next to large intertidal sand flat areas. Thankfully horseshoecrab.org provides a map of the popular spawning sites with the highest densities on their website seen above.

You can try your luck at any of these beaches, but since there’s only so much time between evening high tide and last light, you won’t be able to visit all of them to see the crabs before the sunset. Here are a few recommended beaches that I came across in my research:

A map of the popular beaches to see the horseshoe crab migration

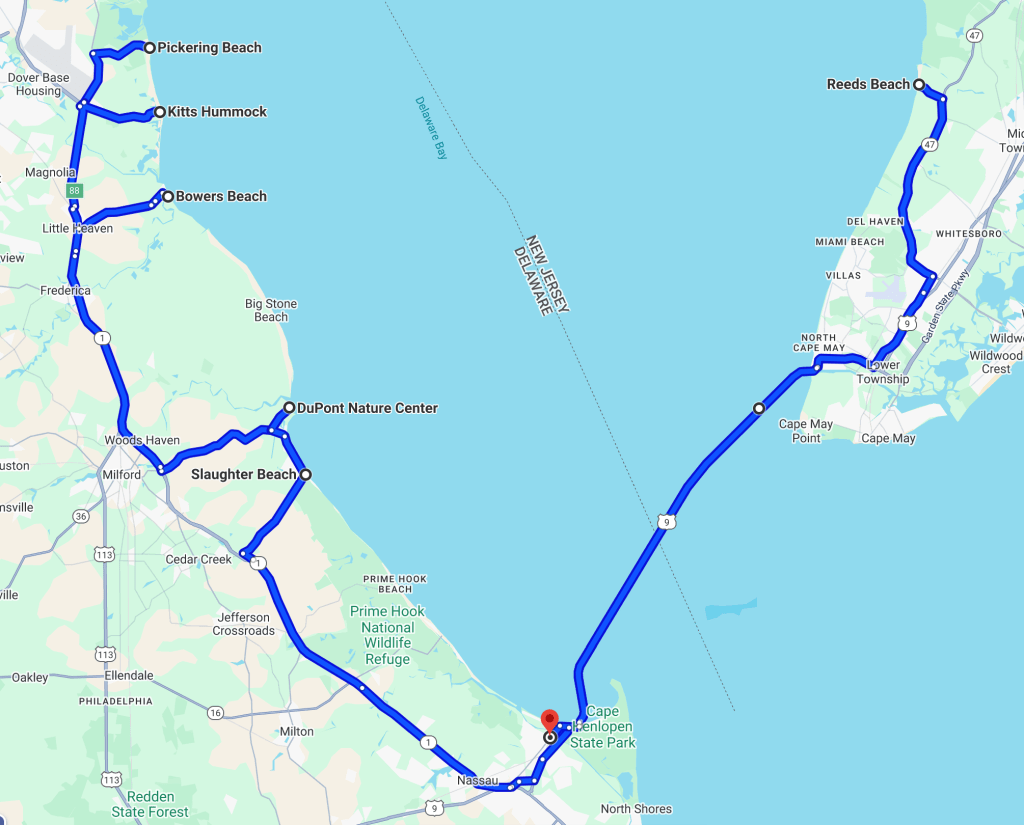
Pickering Beach, DE: An official horseshoe crab sanctuary with limited public parking spaces along the road near the public access to the beach. Roughly 15 minutes south of Dover.

Kitts Hummock, DE: Another official horseshoe crab sanctuary, also with limited public parking spaces along the road near the public access to the beach.

Bowers Beach, DE: A public beach within a small bay community. There’s plenty of beach parking in a public lot on South Flack Avenue a block away (type in “Bowers Beach Parking Lot” on Google Maps or 102 South Flack Avenue, Frederica).

DuPont Nature Center, DE (2992 Lighthouse Road, Milford): This is NOT a place to see horseshoe crabs in their nature, but instead it is an education centre with interactive exhibits if you want to learn more about the horseshoe crabs!

Slaughter Beach (354 State Road 15, Milford): One of the most popular hotspots, has plenty of parking.

Reeds Beach, Middle Township, NJ: One of the more popular spots on the New Jersey Side to see the migration due to its closer vicinity to Cape May.

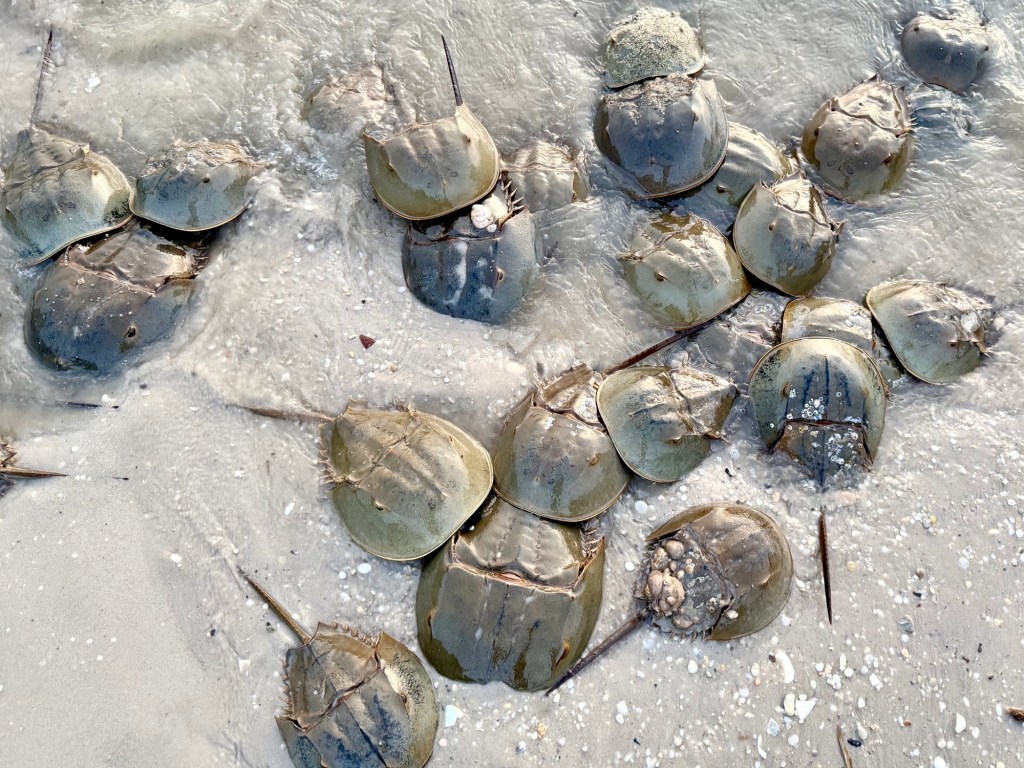
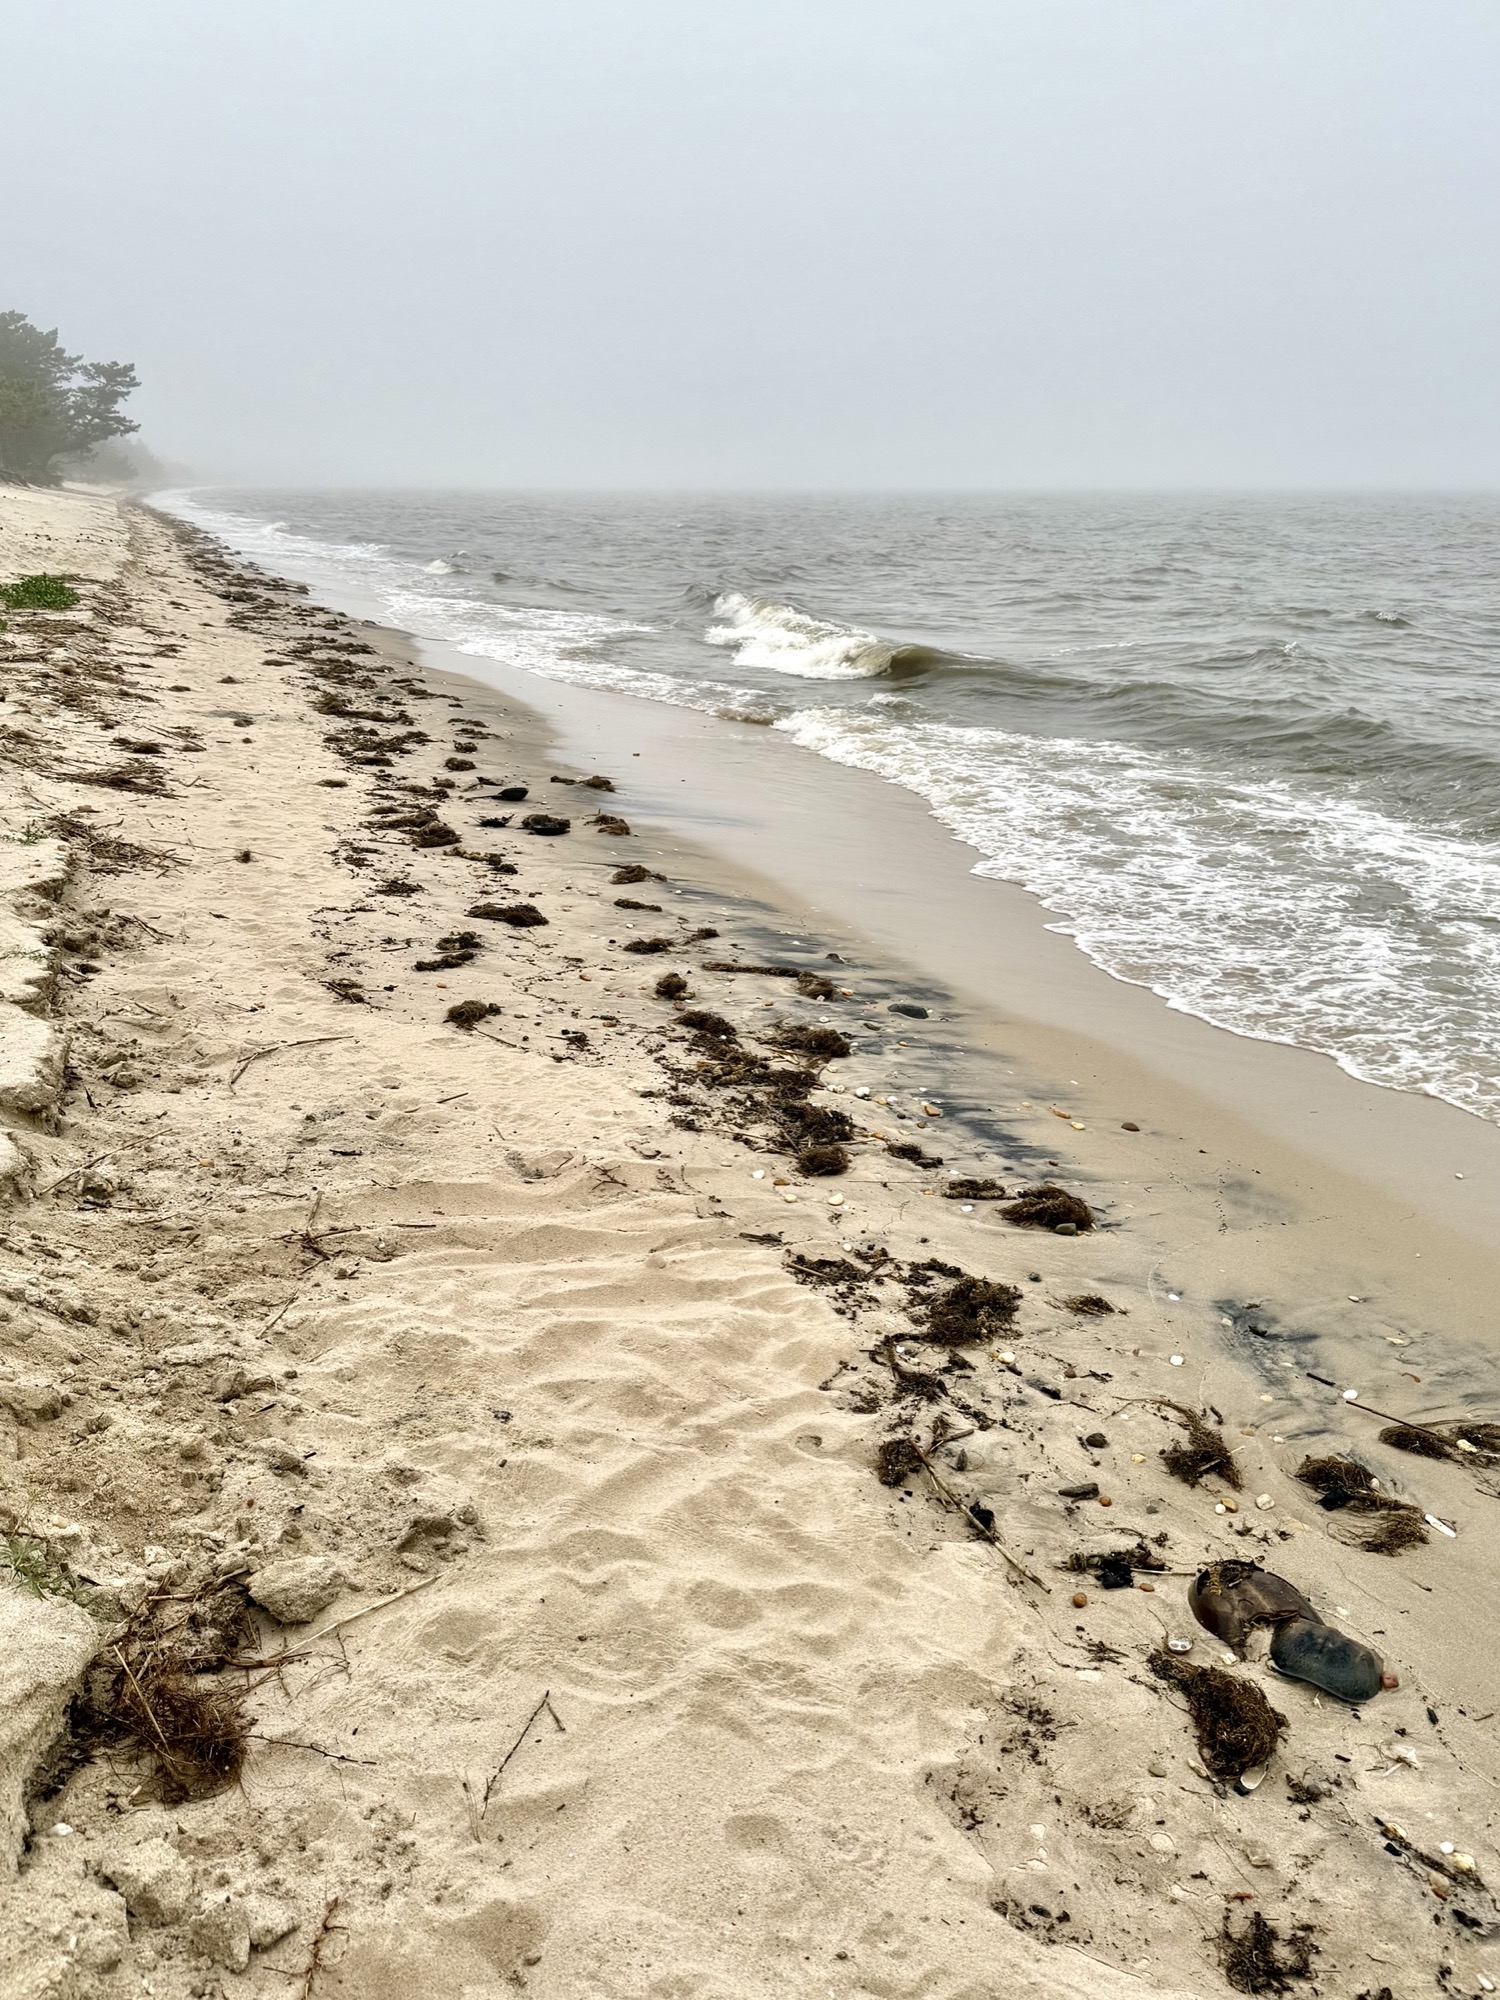
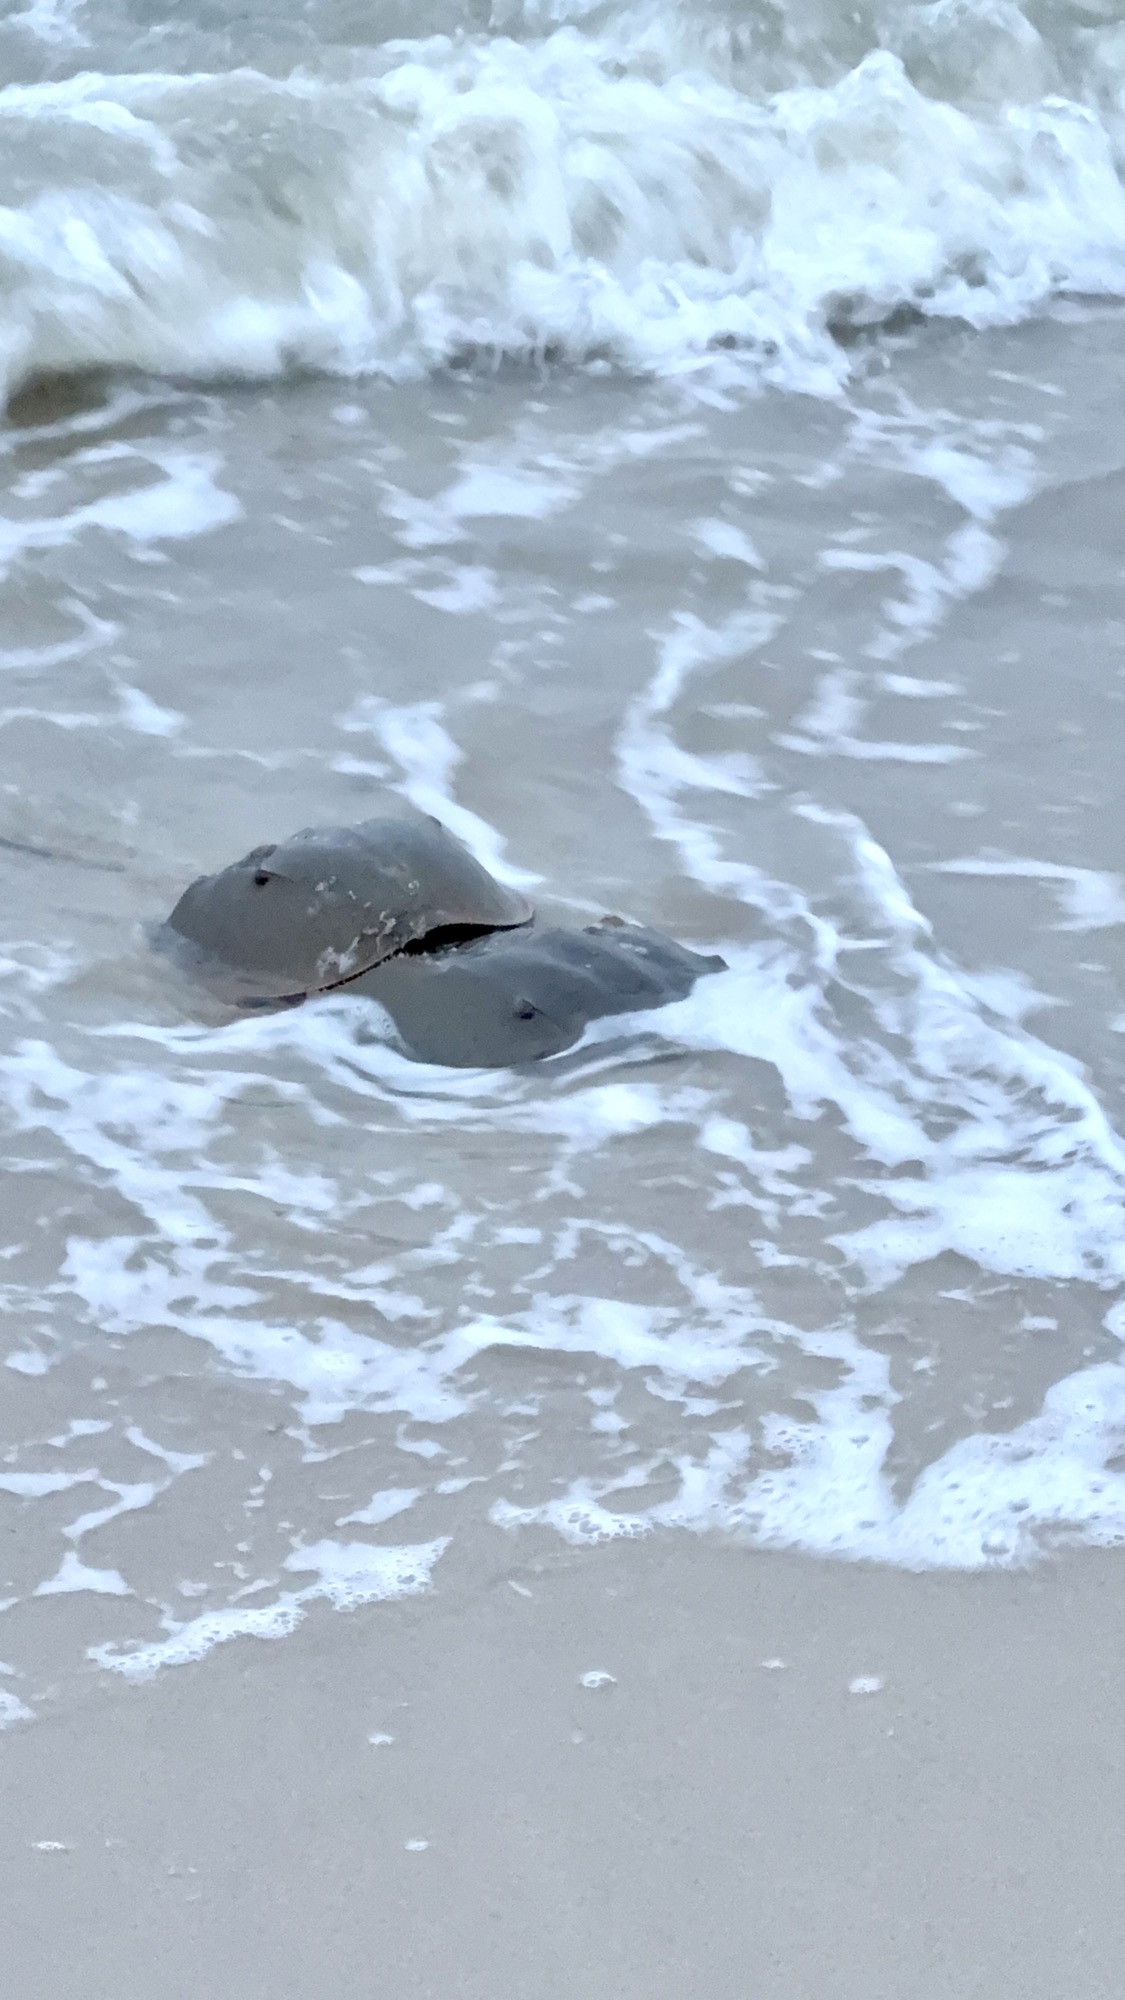
Our actual experience: Due to timing and our travel itinerary, we chose Slaughter Beach as our beach of choice to see the migration. Even though we went at the perfect time of day, unfortunately being that it was the end of the season and we were still 2 days out from the full moon, we only saw one mating pair. I was really disappointed after all of the effort we took to plan our trip around the migration. Luckily we had already planned to take the ferry to Cape May the next day to continue our road trip, and decided last minute to try our luck on the New Jersey side at Reeds Beach. On our way to Reeds Beach, there was a small tiny beach between a few houses on the side of the road that had TONS of horseshoe crabs!! I was ecstatic! After spending a good half an hour or so here, we headed up to Reeds Beach which surprisingly, although was a MUCH bigger beach, the number of horseshoe crabs here were a lot less (but definitely more migratory birds), so we went back to the original tiny beach 2 minutes away. My take on this experience is that if you don’t see many crabs, try driving around the area along the waters to see if there’s a pocket of beach with more crabs! (But also more importantly, try to go on a full moon or new moon unlike us to increase your chances at seeing them.)

Here are some photos of our experience at Slaughter Beach (Toby found a HUGE female that was unfortunately dead but super cool to see the anatomy up close):

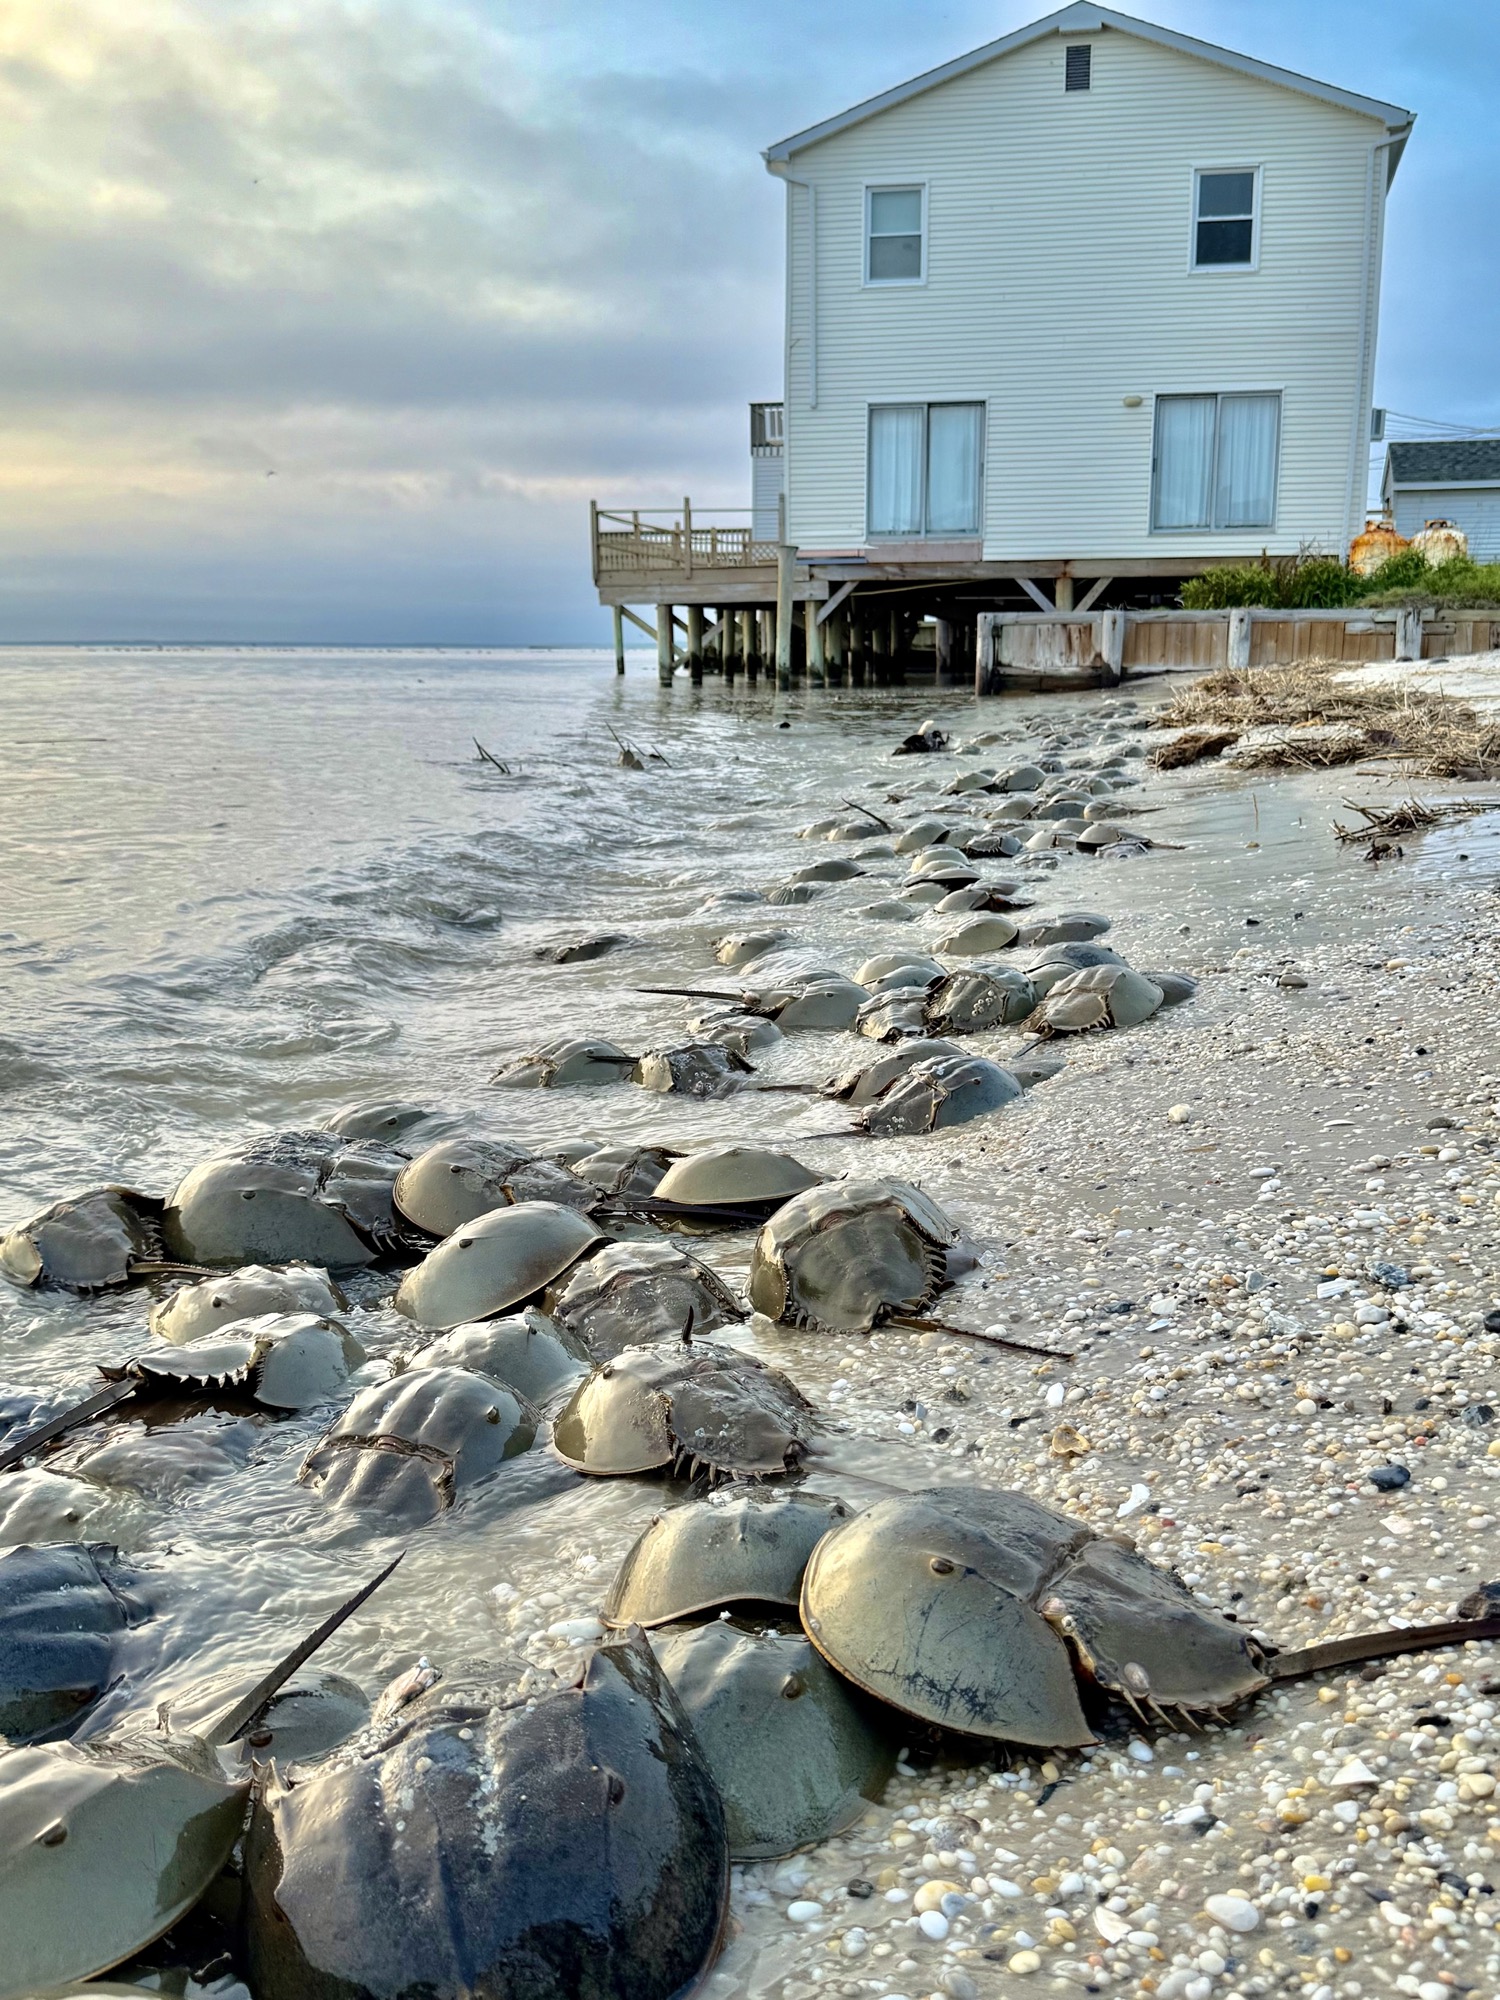
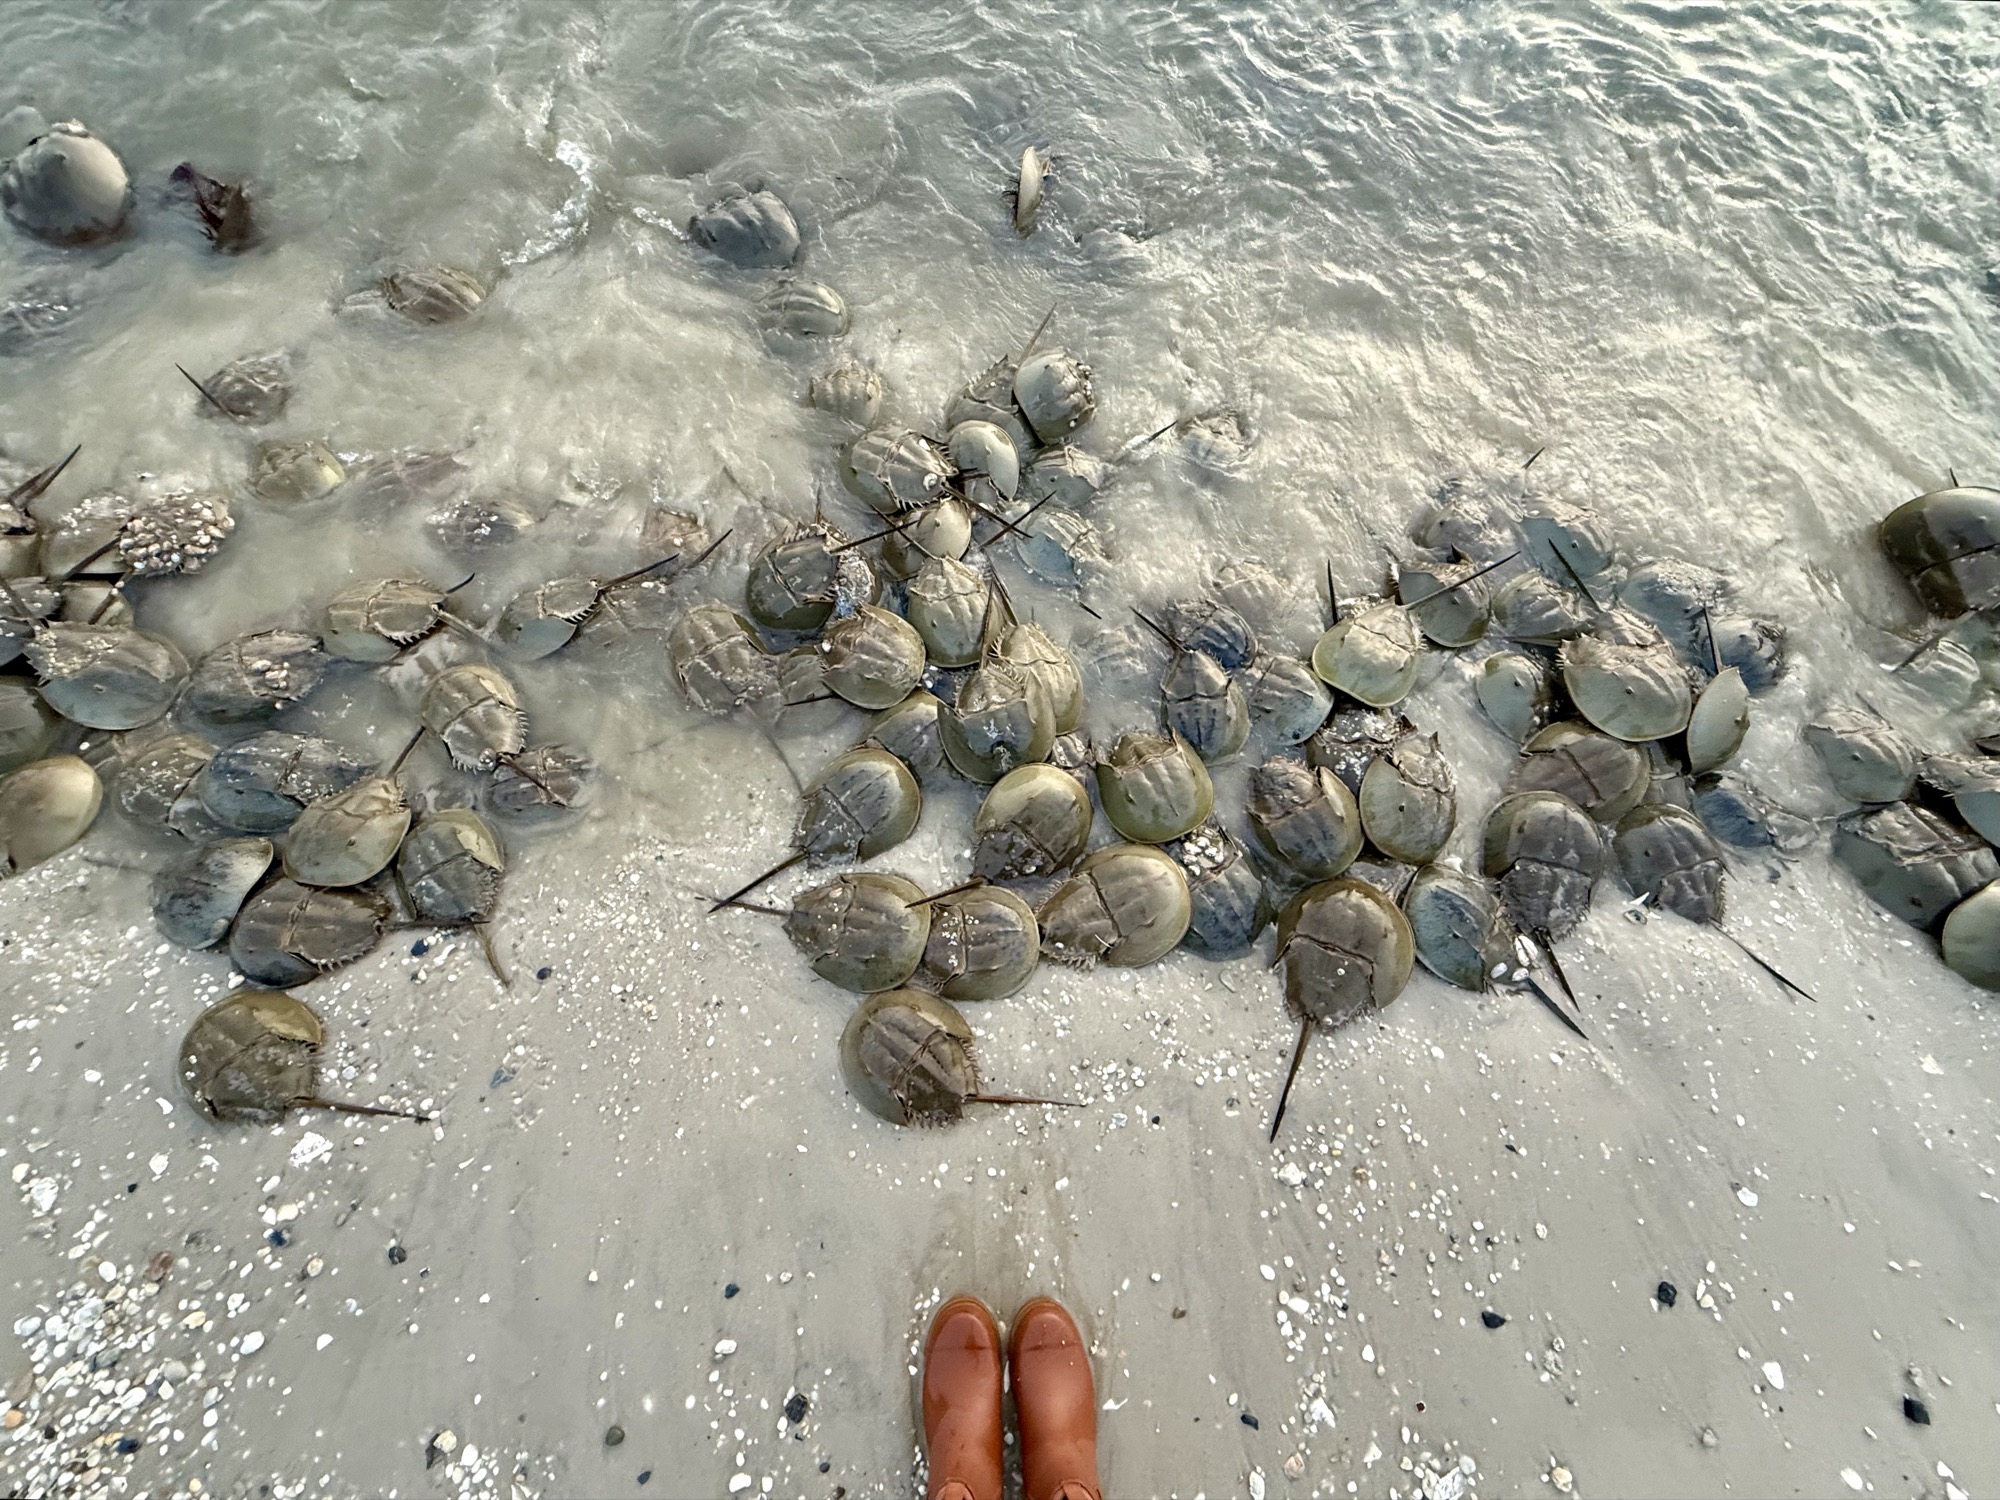
Here are some photos of the little beach we found between some houses on our way to Reeds Beach in New Jersey:

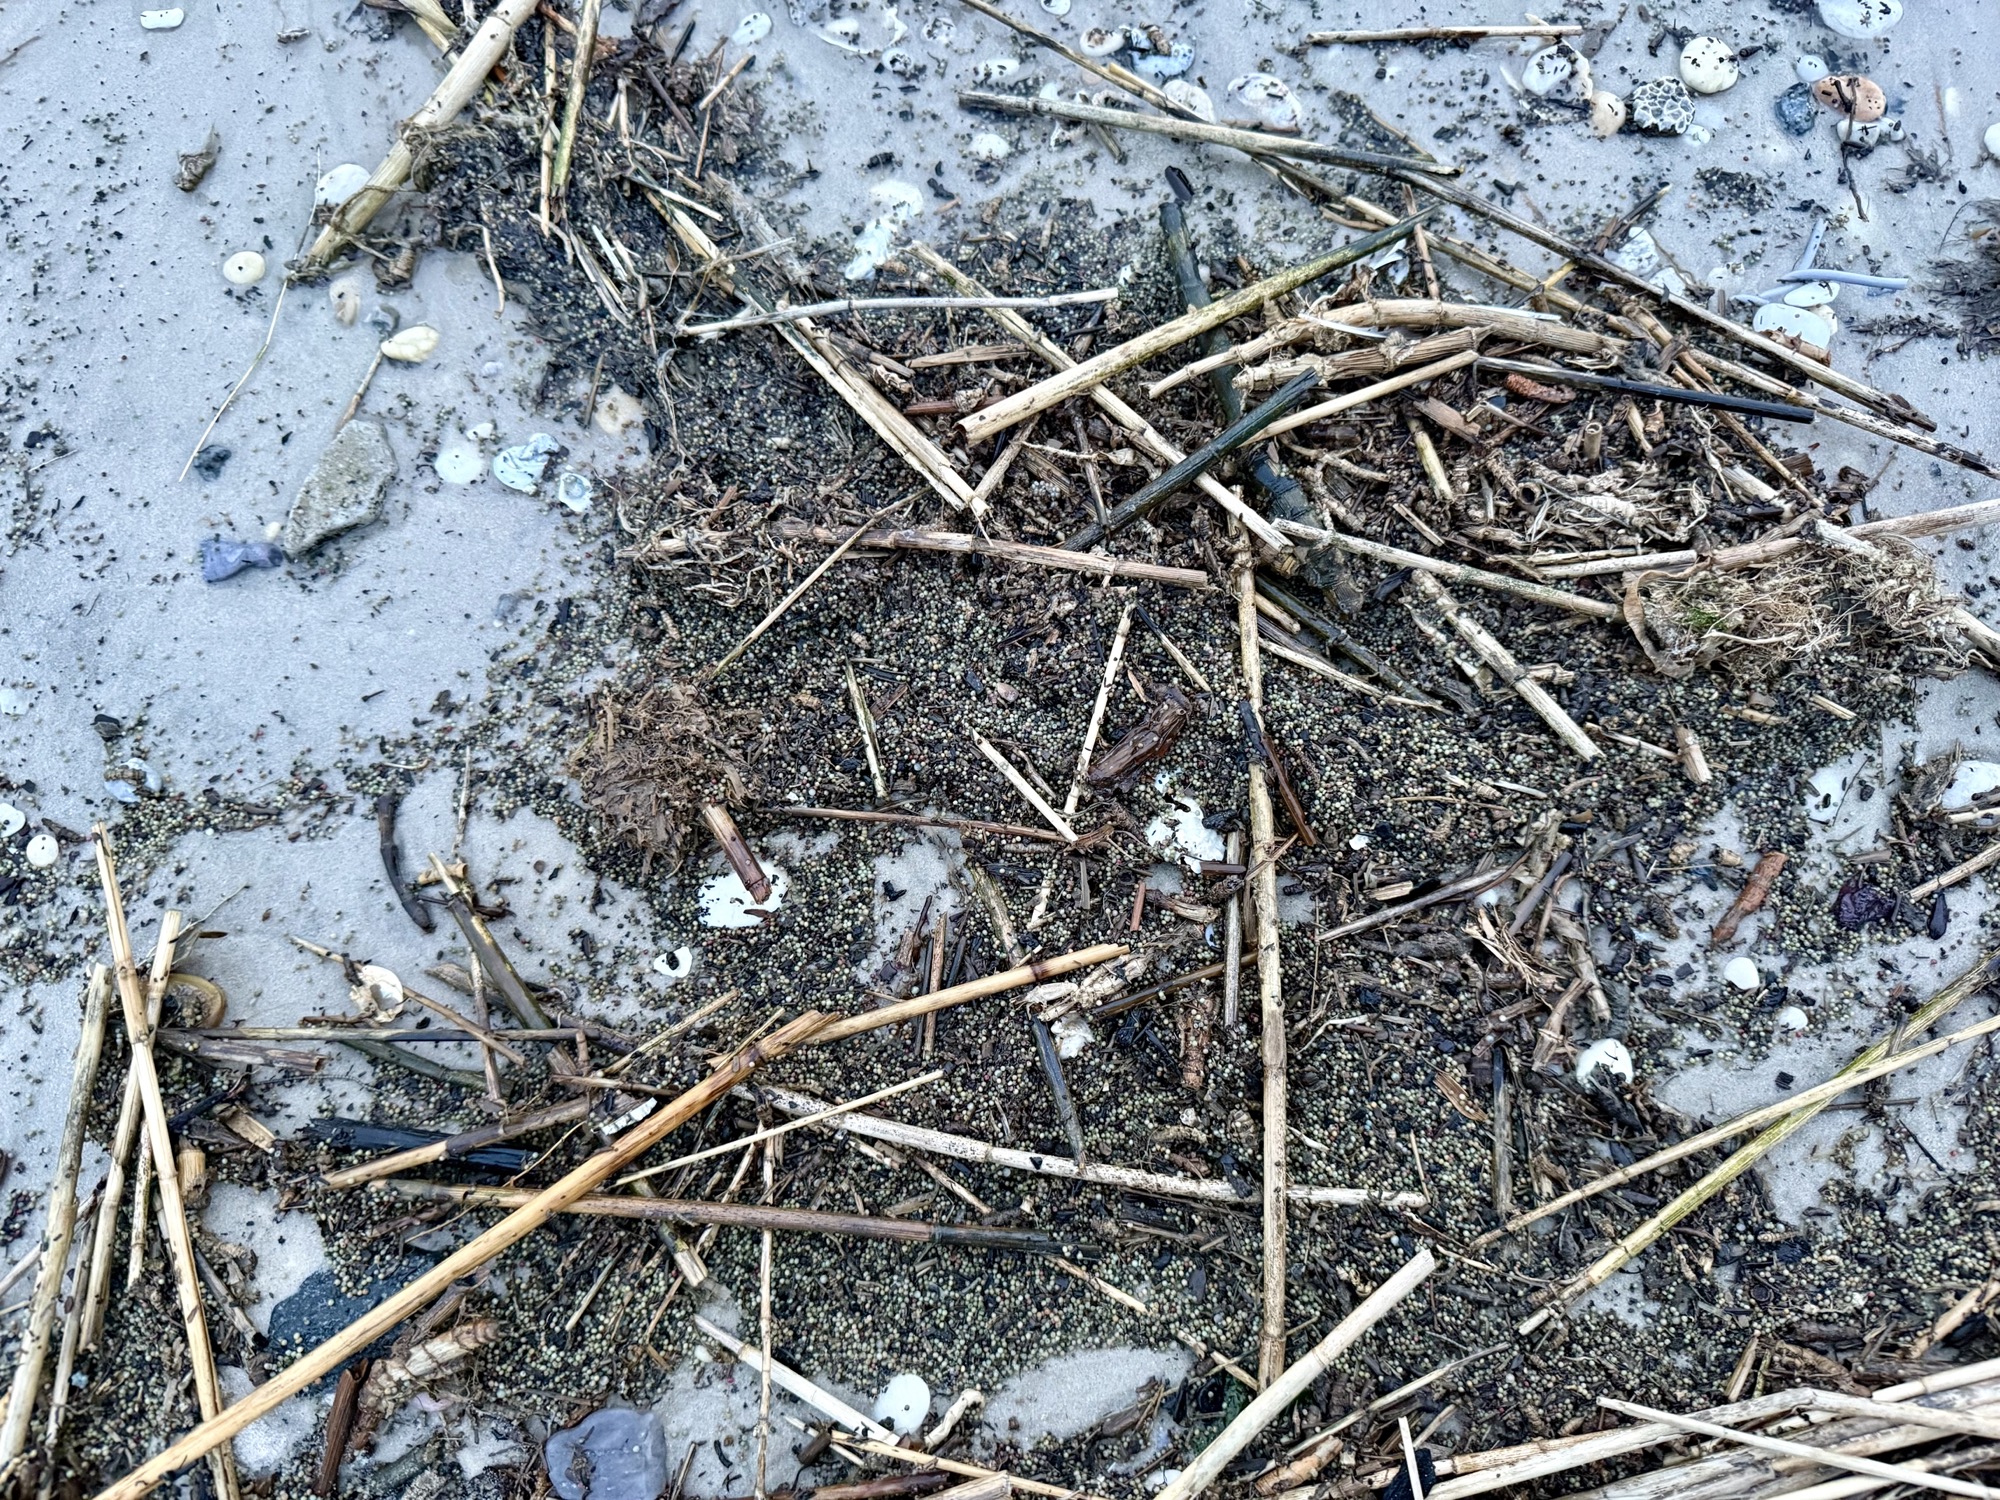
Here are some photos of Reeds Beach, NJ – not as many horseshoe crabs but TONS of eggs on the shore and migratory birds in the distance:

Timing is Crucial to Witness the Migration!

The horseshoe crab migration happens every year in the spring between the end of April to the start of June, with the peak season in mid May-June. We were late to the migration when we went on June 9th-10th 2025 and although we didn’t see as many on the Delaware side, we saw plenty on the New Jersey side (more on this later).

Peak spawning occurs on a full moon or new moon and in the evening at high tide. You want to arrive at least 30 mins before high tide (it actually lines up nicely with sunset to make it all the more magical!).

The monthly tide charts on the US Harbors website is useful when picking a date and time since it has both the moon phase and the tide times in their charts. Check it out here (I have it set to Bowers Beach, but you can always google more specific tide times depending on which beach you choose to go): https://www.usharbors.com/harbor/delaware/bowers-beach-de/tides/#monthly-tide-chart

Here is a sample of the May 2026 tide chart from the US Harbors website. In case you’re unfamiliar with reading their tide chart, I’ve circled the important areas in blue and red:

To read the chart to pick the best day:

1) First look at the Moon column on the right and determine which dates are full moon and new moon. From the chart, the full moon is on Sat May 2nd and the new moon is on Sun May 17th.

2) From those dates, find the PM high tide time of the day. From the chart, it’s 10:49pm on May 2nd and 10:38pm on May 17th (circled in red).

3) Since you want to arrive 30 minutes ahead of the high tide, your ideal time to witness the migration in May 2026 would be on either May 2nd 10:19pm or May 17th at 10:08pm. (I’m writing this post in November 2025, so double check the charts before you go to ensure this forecasted information is still accurate if you’re going in May.)

Don’t worry if you can’t make it exactly on a full moon or a new moon, we were 2 days early before a full moon and still saw tons of them on the New Jersey side, but we did have to drive up and down the coast a little to find a good spot to see them.

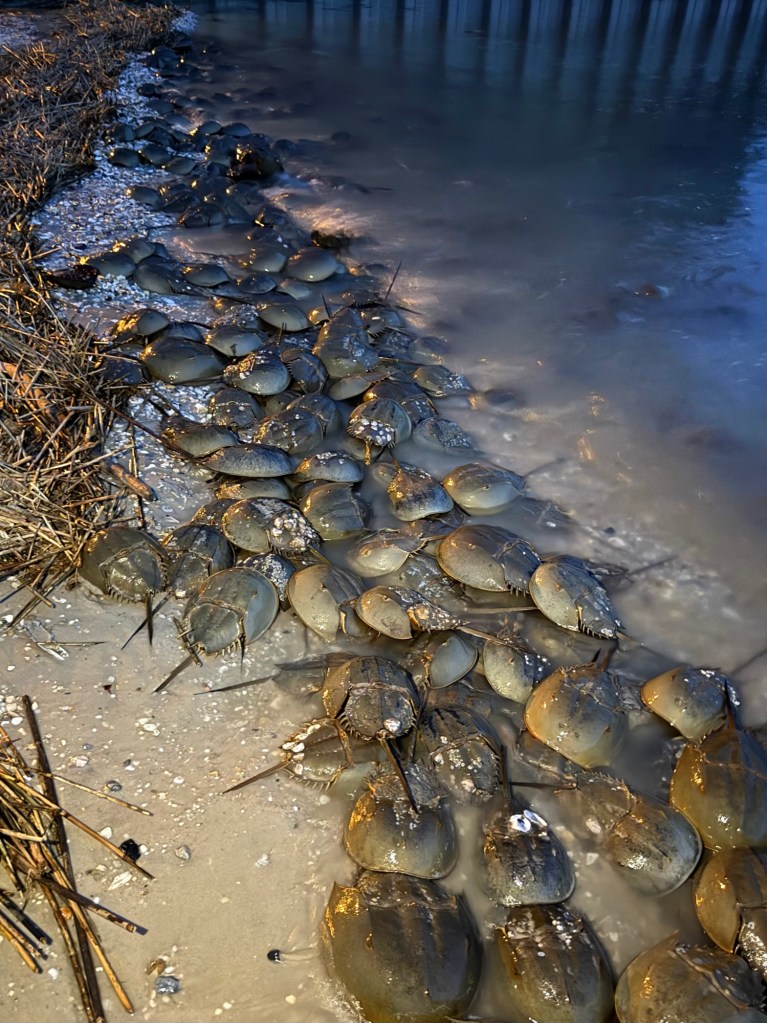
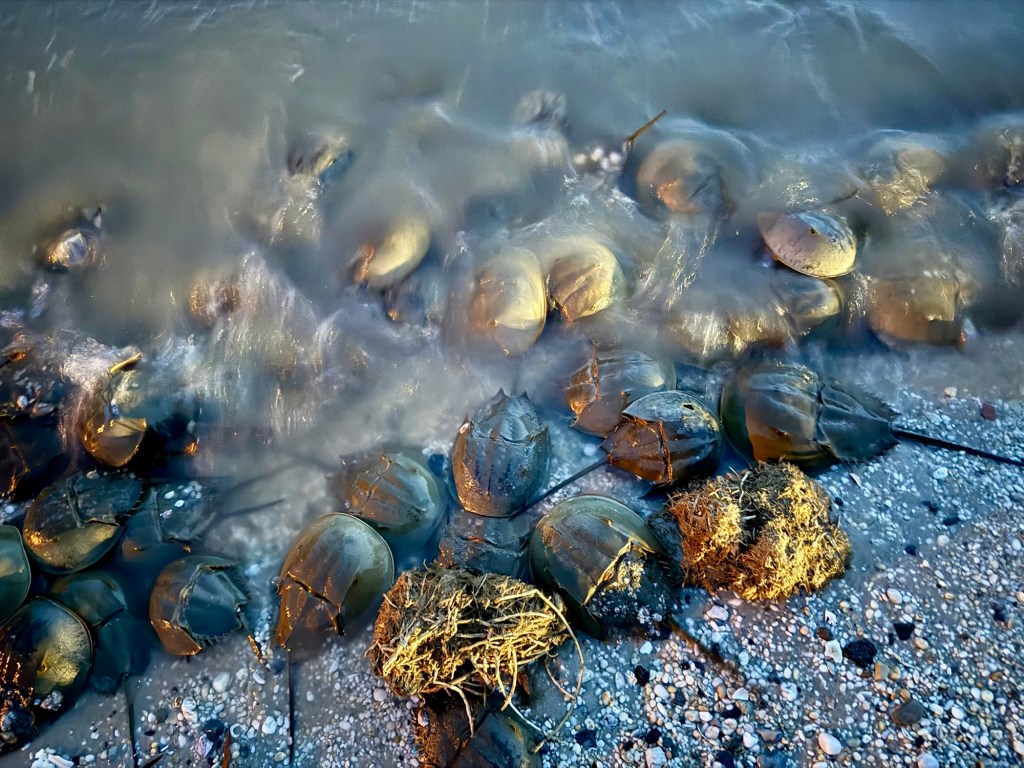
As beautiful and amazing as this event is to witness, know that once the sun goes down, the horseshoe crabs will continue to come to shore and can get to horror movie-level numbers. I still found it really cool, but realize that it may not be for everyone – one of my coworkers was not a fan of my night time migration photos at all 😂.

Here are some night time photos of the migration so you know what to expect:

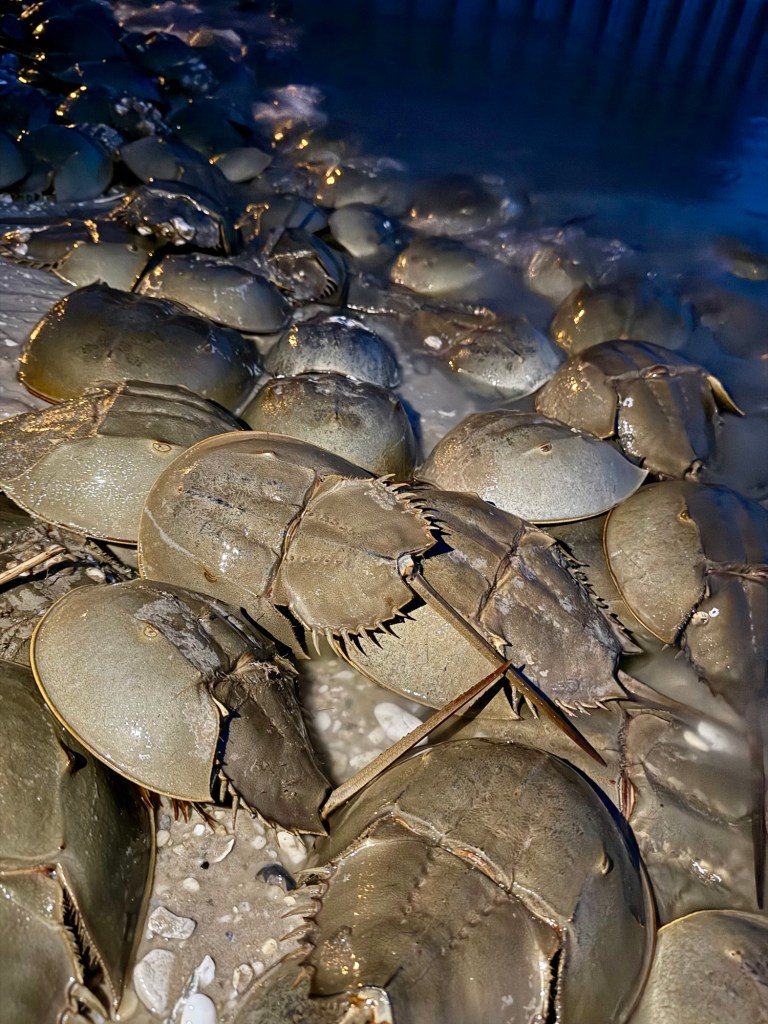
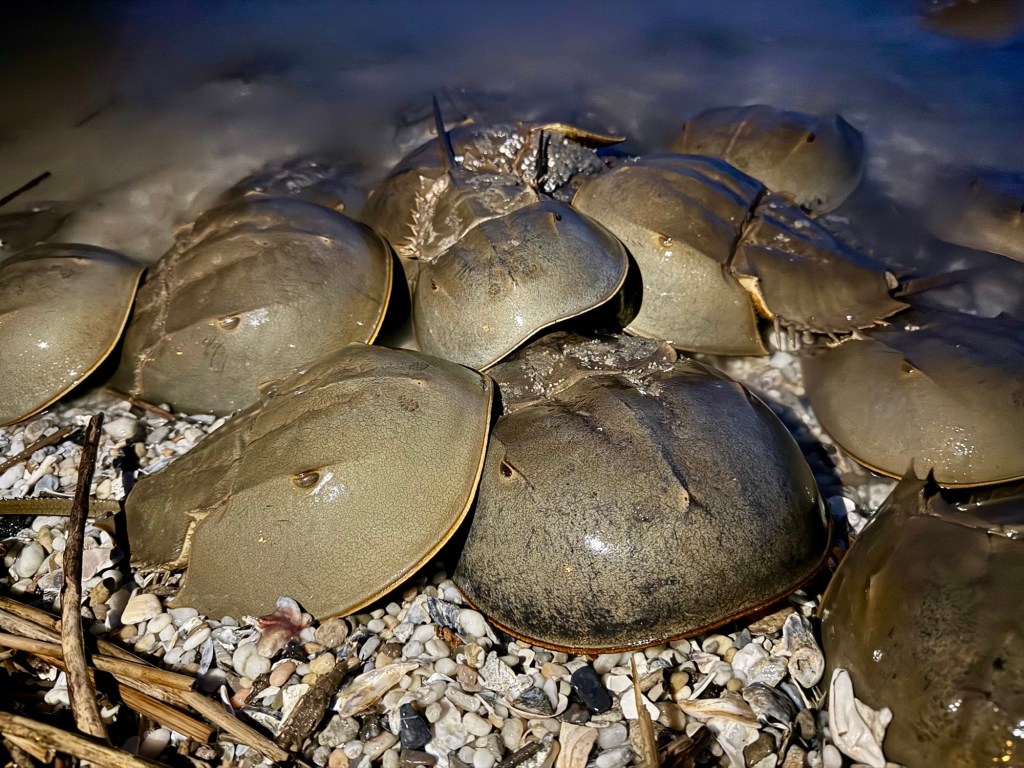
If you get all 3 things correct in terms of timing (1. season, 2. full moon or new moon, 3. evening high tide), you should be able to see hundreds if not thousands of horseshoe crabs!

If you come back to the beach early next day, you may be able to see the migratory birds feeding on the eggs!

What to Bring to See the Horseshoe Crab Migration?

  • Sturdy waterproof shoes (ie. rain boots or waterproof hiking shoes)
    • The horseshoe crabs will hang out just on the shoreline where the water and the beach meet, so if you want to get up close, waterproof shoes are recommended to avoid your shoes from getting wet.
    • Depending on the beach, there can be a lot of debris, sticks, and dead horseshoe crabs that didn’t quite make it, so a sturdy pair of shoes will be best to walk through it.
    • I’d recommend rain boots as the shoe of choice because it can smell a little fishy on the beach (after all, they are spawning), so you want to wear shoes that are easy to rinse off afterwards.
  • Bug spray or covered clothing
    • We learned this the hard way. There were so many teeny tiny flies and although I wore leggings (albeit thin), they managed to bite through and around my uncovered ankles. Although not painful, I was hella itchy for a few weeks. I counted 14 bites on both legs when we got back to our hotel. 😫
  • Headlamp or flashlight
    • Depending on the day, if the evening high tide occurs after sunset, you’ll want a light source to see these guys best. The most abundant numbers occur at night and a headlamp will keep your hands free if you’re walking through debris or taking photos.

Now you’re ready!

Now that you know the season (spring, May-June), the day (full moon or new moon), the time (30 minutes prior to the evening high tide), and the location (beaches within the Delaware Bay), you’re now ready to see the amazing horseshoe crab migration! I’d love to hear about your trip in the comments!

One more thing, if you see any overturned horseshoe crabs…Just flip ’em!

Due to their wide anatomy and the rushing waves, unfortunately you’ll more than likely see a few overturned horseshoe crabs. Sometimes they’ll be able to correct their own position with the right tide or passerby, but more often than not many of them will die stranded. So if you see an overturned horseshoe crab, just flip them over! Although they can look a little scary and pointy up close, horseshoe crabs are very gentle creatures and they do not sting nor bite. The best and gentlest way to flip them over is to grab them by the edge of the shell and flip them over. Do not grab them by the tail! Although it doesn’t look like it, they actually have very delicate tails and can damage easily.

Spread the word! Save the stranded overturned horseshoe crabs!

The ERDG (Ecological Research & Development Group), a non-profit wildlife conservation that focuses on the conservation of the world’s four horseshoe crab species, has a “Just flip ’em program” that promotes flipping stranded horseshoe crabs (https://www.horseshoecrab.org/act/flipem.html) and has made a fantastically catchy song that can be found on the website or directly linked here: https://www.horseshoecrab.org/poem/img/makinmusic/justflipem.mp3. The lyrics are amazing and I’ve literally already listened to it 3 times back to back while writing this post 😂. I wish it was on Spotify.

PS: Horseshoe crab numbers are declining due to habitat destruction and you can volunteer to be a part of the horseshoe crab survey to keep an eye on the numbers: https://www.delawarebayhscsurvey.org/.

Their website has posted volunteer survey dates every year which is a good guide to when you should go see the horseshoe crabs. I’ve attached a copy of their 2025 dates top the left.

Some Final Thoughts

  • Horseshoe crabs are super cool.
  • The annual mass migration will blow your mind 🤯 and is 100% worth it.
  • There are only 2 “perfect” days every month (new moon and full moon), so make sure you plan ahead!
  • Wear good shoes you can wash – yes, it will smell fishy.
  • Flip over any stranded overturned horseshoe crabs!

Quick and Easy Shrimp & Egg Tofu Bites


Date Published: Sept 24th, 2025 | Last Updated: Sept 24th, 2025
Author: Abby |Category: appetizer, snacks, asian, <30 mins, easy, healthy, low-cal
Serves: 1 plate as an appetizer | Prep time: 10 mins | Cook time: 10 mins

Jump to recipe |

This shrimp and egg tofu bites dish is a super easy Asian appetizer/snack that cooks up quickly and looks impressive. If you’re in a pinch for a dinner party or just feeling snacky, this is the recipe for you! It’s made of homemade shrimp paste and soft egg tofu, finished off with a simple savoury sauce.

A note on egg tofu:

If you’re unfamiliar with egg tofu, it is a soft tofu (not quite silken) that has a yellow-tinge in colour and is often packaged in a plastic tube, like the picture on the right. You can find it in the tofu section of most Asian supermarkets.

Anyways, without further ado, here’s the recipe! If you have any comments or suggestions, I’d love to hear from you in the comment section! You can follow me on instagram, youtube and facebook to see all the recipes I post!

Happy cooking!

Equipment you’ll need:

  • Food processor (optional but it will make your life easier)
  • Large steaming basket or a metal trivet in a wok with a lid

Ingredients you’ll need:

  • Shrimp mixture:
    • 6 large (140g) raw shrimp, deshelled and deveined
    • 1 Tbsp (13g) ginger, peeled and roughly chopped
    • 2 green onions (white and green parts separated)
    • 1 tsp Shaoxing wine (Chinese cooking wine)
    • 1/2 tsp corn starch
    • 1/2 tsp sesame oil
    • 1/8 tsp ground white pepper
    • 1/8 tsp kosher salt
  • 1 package egg tofu
  • Sauce:
    • 1/3 cup water
    • 1/2 tsp soy sauce
    • 1 tsp oyster sauce
    • 1/4 tsp sesame oil
    • 1/8 tsp ground white pepper
    • 1/8 tsp granulated sugar
    • 1/2 tsp corn starch

Directions:

Slice the egg tofu into 2.5cm thick rounds and place on a heat-proof plate.

In a food processor, add in your shrimp mixture: raw shrimp, 1 Tbsp ginger, 2 green onions (white part only), 1 tsp Shaoxing wine, 1/2 tsp corn starch, 1/2 tsp sesame oil, 1/8 tsp ground white pepper, and 1/8 tsp salt. Blend until you get a smooth paste.

Carefully spoon a tablespoon of the shrimp mixture onto each egg tofu round. Place the plate in a steaming basket and steam for 10 minutes until the shrimp is set and cooked all the way through. If you don’t have a steaming basket, you can add a few centimetres of hot water into a wok and place the plate of shrimp tofu on an elevated plate or tray in the centre and add the lid over (as pictured).

Make the sauce: While the shrimp and tofu steams, make the sauce by combining all the sauce ingredients (1/3 cup water, 1/2 tsp soy sauce, 1 tsp oyster sauce, 1/4 tsp sesame oil, 1/8 tsp white pepper, 1/8 tsp sugar, 1/2 tsp corn starch). Whisk until there are no lumps, then heat the sauce in a small pan on MED heat until it simmers and thickens (3-5 minutes) then turn off the heat.

When the shrimp/tofu finishes steaming, remove the lid and use a papertowel to remove any collected water on the plate. Pour the sauce (from step 4) onto the plate around the shrimp/tofu and garnish with chopped green part of the green onions on top. Serve immediately. Enjoy!

Summarized Recipe:

Quick and Easy Shrimp & Egg Tofu Bites

Date Published: Sept 24th, 2025 | Last Updated: Sept 24th, 2025
Author: Abby |Category: appetizer, snacks, asian, <30 mins, easy, healthy, low-cal
Serves: 1 plate as an appetizer | Prep time: 10 mins | Cook time: 10 mins

Ingredients:

  • Shrimp mixture:
    • 6 large (140g) raw shrimp, deshelled and deveined
    • 1 Tbsp (13g) ginger, peeled and roughly chopped
    • 2 green onions (white and green parts separated)
    • 1 tsp Shaoxing wine (Chinese cooking wine)
    • 1/2 tsp corn starch
    • 1/2 tsp sesame oil
    • 1/8 tsp ground white pepper
    • 1/8 tsp kosher salt
  • 1 package egg tofu
  • Sauce:
    • 1/3 cup water
    • 1/2 tsp soy sauce
    • 1 tsp oyster sauce
    • 1/4 tsp sesame oil
    • 1/8 tsp ground white pepper
    • 1/8 tsp granulated sugar
    • 1/2 tsp corn starch

Directions:

  1. Slice the egg tofu into 2.5cm thick rounds and place on a heat-proof plate.
  2. In a food processor, add in your shrimp mixture: raw shrimp, 1 Tbsp ginger, 2 green onions (white part only), 1 tsp Shaoxing wine, 1/2 tsp corn starch, 1/2 tsp sesame oil, 1/8 tsp ground white pepper, and 1/8 tsp salt. Blend until you get a smooth paste.
  3. Carefully spoon a tablespoon of the shrimp mixture onto each egg tofu round. Place the plate in a steaming basket and steam for 10 minutes until the shrimp is set and cooked all the way through. If you don’t have a steaming basket, you can add a few centimetres of hot water into a wok and place the plate of shrimp tofu on an elevated plate or tray in the centre and add the lid over (as pictured).
  4. Make the sauce: While the shrimp and tofu steams, make the sauce by combining all the sauce ingredients (1/3 cup water, 1/2 tsp soy sauce, 1 tsp oyster sauce, 1/4 tsp sesame oil, 1/8 tsp white pepper, 1/8 tsp sugar, 1/2 tsp corn starch). Whisk until there are no lumps, then heat the sauce in a small pan on MED heat until it simmers and thickens (3-5 minutes) then turn off the heat.
  5. When the shrimp/tofu finishes steaming, remove the lid and use a papertowel to remove any collected water on the plate. Pour the sauce (from step 4) onto the plate around the shrimp/tofu and garnish with chopped green part of the green onions on top. Serve immediately. Enjoy!

Haluski – a yummy buttery cabbage & noodle dish


Date Published: April 16th, 2024 | Last Updated: April 16th, 2024
Author: Abby |Category: mains, easy, Czech, <30 mins
Serves: 4-6 | Prep time: 20 mins | Cook time: 30 mins

Jump to recipe |

I’ll be honest, I had never heard of Haluski before until one day I was googling recipes for inspiration on how to use up my week old leftover cabbage in the fridge, so there’s no heart felt nostalgia or travel memory associated with this dish to fill up this post. I simply saw it, tested a few recipes, and decided on this version that I’m sharing today because it’s tasty.

From my Google research, Haluski is a central/eastern European dish with arguable origins of either Poland, Solvakia, Hungary, or Ukraine – Toby thinks there’s even a Czech version too. It’s essentially bacon, onions, and cabbage cooked in butter and bacon fat, then mixed with fresh cooked egg noodles. It’s quick and easy, a little oily (from the butter and bacon fat), and definitely delicious. Give it a try!

Anyways, without further ado, here’s the recipe! If you have any comments or suggestions, I’d love to hear from you in the comment section! You can follow me on instagram, youtube and facebook to see all the recipes I post!

Happy cooking!

Ingredients you’ll need:

  • 3 Tbsps butter
  • 400g (~6 strips) of thick cut bacon, chopped
  • 1 large yellow onion, diced
  • 2 cloves garlic, minced
  • 1 med cabbage (~1kg), cored and diced
  • 4 portions (~10oz) of egg noodles – or alternatively nokedli
  • Fresh ground black pepper to taste
  • Kosher salt to taste

Directions:

In a large skillet on MED-HIGH heat, melt the butter until it starts to lightly brown – you’ll smell the aroma of brown butter.

Then add in the bacon and sauté until browned and lightly crispy.

Next, add the garlic and onions. Continue to cook for another 3-4 minutes until the onion is translucent and lightly browned.

Next, add in the diced cabbage and sauté for 8-10 minutes until the cabbage has softened and lightly browned.

While the cabbage is cooking, cook the egg noodles in salted water according to package instructions. When cooked, drain and set aside.

Once the cabbage has cooked, add in the cooked egg noodles, freshly ground black pepper, and a big pinch of salt. Mix it around and taste to adjust salt as needed. Done!

Summarized Recipe:

Haluski – a yummy buttery cabbage & noodle dish

Date Published: April 16th, 2024 | Last Updated: April 16th, 2024
Author: Abby |Category: mains, easy, Czech, <30 mins
Serves: 4-6 | Prep time: 20 mins | Cook time: 30 mins

Ingredients:

  • 3 Tbsps butter
  • 400g (~6 strips) of thick cut bacon, chopped
  • 1 large yellow onion, diced
  • 2 cloves garlic, minced
  • 1 med cabbage (~1kg), cored and diced
  • 4 portions (~10oz) of egg noodles – or alternatively nokedli
  • Fresh ground black pepper to taste
  • Kosher salt to taste

Directions:

  1. In a large skillet on MED-HIGH heat, melt the butter until it starts to lightly brown – you’ll smell the aroma of brown butter, then add in the bacon. Sauté the bacon until browned and lightly crispy.
  2. Next, add the garlic and onions. Continue to cook for another 3-4 minutes until the onion is translucent and lightly browned.
  3. Next, add in the diced cabbage and sauté for 8-10 minutes until the cabbage has softened and lightly browned.
  4. While the cabbage is cooking, cook the egg noodles in salted water according to package instructions. When cooked, drain and set aside.
  5. Once the cabbage has cooked, add in the cooked egg noodles, freshly ground black pepper, and a big pinch of salt. Mix it around and taste to adjust salt as needed. Done!

Cantonese Fried Fish with a Corn Gravy (粟米斑塊)


Date Published: April 14th, 2024 | Last Updated: April 14th, 2024
Author: Abby |Category: Asian, easy, mains
Serves: 4-6 (1 large plate) | Prep time: 20 mins | Cook time: 30 mins

Jump to recipe |

This dish a wrapped in nostalgia for me. It’s fried fish fillet pieces with a cornstarch/egg/corn gravy drizzled over top. It’s a savoury dish with a little sweetness in the sauce. Serve over a bed of jasmine rice and some veggies.

When our family first moved to Canada from Taiwan, there were limited options of Asian restaurants and grocery stores in our neighbourhood at the time. I remembered my mom always went to the same small Asian grocery store and beside it was a little Asian restaurant called ‘New Asia’. It was a small place with no more than 4-5 tables, each with a thick layer of disposable white plastic tablecloths on top. We’d either dine-in or mom would occasionally get takeaway to bring home after a visit to the grocery store next door. On one dine-in occasion, I must’ve been about 8-9 years old at the time, it was a quiet wintery night and there was only one other table apart from ours at the restaurant. My mom was taking care of us 3 kids on her own and suddenly the older white couple at the other table came over to us and gave us their order of corn fish that had just arrived at their table. They said it was really good and we had to try it. I thought it was really random that these strangers were offering us part of their dinner, but my mom didn’t want to be rude so she accepted it. There is a lot of similarity and overlap in Taiwanese/Chinese/Cantonese cuisine, but I had never seen corn fish before. It looked like a weird plate of corn goop over fish and at first we were skeptical, but we all tried it and it was AMAZING! Ever since then, that corn fish dish became one of our favourite items to order. Sadly, that restaurant has since closed down (ages ago, actually) and I had forgotten all about that dish until in recent years I was walking past a Cantonese restaurant in Melbourne and they had their menu with blown up photos pasted all over their windows and surprisingly, corn fish was one of the photos! It brought me right back to those childhood days eating this dish with my mom and siblings.

This recipe has been on my to-cook list for a while and I have no idea why it took me so long to actually attempt it, but it’s actually so much easier than I thought and it cooks up quickly. I’m proud to be adding this to my recipe collection. 😊

Anyways, without further ado, here’s the recipe! If you have any comments or suggestions, I’d love to hear from you in the comment section! You can follow me on instagram, youtube and facebook to see all the recipes I post!

Happy cooking!

Ingredients you’ll need:

  • Fish marinade:
    • 1/4 tsp kosher salt
    • 1/4 tsp ground white pepper
    • 2 Tbsps cornstarch
    • 1 green onion, minced
    • 800g boneless, skinless white fish fillets (ie. cod, haddock, tilapia, sole, pollock)
  • 4 cups of neutral oil for frying (ie. vegetable oil, canola oil)
  • Breading:
    • 2 eggs, beaten
    • 1 cup all-purpose flour
    • 1/3 cup corn starch
  • Creamy Corn Gravy:
    • 3/4 tsp cornstarch
    • 1/3 cup water
    • 1 clove garlic, minced
    • 1 can (418g) creamed corn/cream style corn
    • 1/4 tsp chicken stock powder
    • 1 egg, beaten
  • Salt and black pepper to taste
  • Garnish (optional): sliced green onion

Directions:

Rinse and pat dry the fish and slice it into 2 inch pieces. Set aside.

Marinate the fish: In a bowl, mix together the salt, white pepper, cornstarch, and green onion. Add in the sliced fish and mix well, ensuring every piece is coated. Be careful not to break the fish when you mix. Set aside and let it marinate for 15 minutes at room temperature.

Prepare the breading: Beat the eggs into a bowl and set aside. In another bowl, mix together the flour and cornstarch.

Heat the oil in a small pot. Once the oil starts to shimmer or if it sizzles when you add in a bit of flour, it’s ready for frying.

Bread and deep fry the fish: When the oil is nearly hot enough, start breading the fish. First coat the fish in the beaten egg (prepared in step 3), then coat it in the flour and cornstarch mixture.

Gently drop the breaded fish pieces one at a time into the hot oil. Only add enough to not overcrowd the pot, roughly 6-7 pieces per batch. Move the pieces around, making sure they’re not sticking to each other and not sticking to the bottom of the pot. Cook for 5-7 minutes or until the outside is slightly browned. Use a slotted spoon to remove the fish from the oil and let it cool on a rack. Repeat this process until all of the fish is fried. Once all of the fish have been fried, fry them all a second time for 2 minutes per batch, starting from the most cooled batch first. This will make the fish extra crispy. Once finished, turn off the heat and set the fried fish aside on the cooling rack while you prepare the corn gravy.

Make the corn gravy: In a small bowl, mix together the cornstarch and water, ensuring there are no lumps. Set aside.

In a saucepan on MED heat, add a small drizzle of oil and sauté the garlic for 1 minute until fragrant. Add in the creamed corn, chicken stock powder, and the cornstarch/water mixture. Whisk everything well and let the sauce come to a boil. Turn the heat down and drizzle the beaten egg into the sauce. Slowly mix it around until the egg is cooked. You want swirls of cooked egg, so don’t over mix it. Once the egg has cooked, turn off the heat. Taste and adjust salt and black pepper to taste.

Finishing touches: To serve, put the fried fish pieces onto a serving plate and pour the hot corn gravy over top. Garnish with sliced green onion. Serve immediately with a side of rice. Done!

Summarized Recipe:

Cantonese Fried Fish with a Corn Gravy (粟米斑塊)

Date Published: April 14th, 2024 | Last Updated: April 14th, 2024
Author: Abby |Category: Asian, easy, mains
Serves: 4-6 (1 large plate) | Prep time: 20 mins | Cook time: 30 mins

Ingredients:

  • Fish marinade:
    • 1/4 tsp kosher salt
    • 1/4 tsp ground white pepper
    • 2 Tbsps cornstarch
    • 1 green onion, minced
    • 800g boneless, skinless white fish fillets (ie. cod, haddock, tilapia, sole, pollock)
  • 4 cups of neutral oil for frying (ie. vegetable oil, canola oil)
  • Breading:
    • 2 eggs, beaten
    • 1 cup all-purpose flour
    • 1/3 cup corn starch
  • Creamy Corn Gravy:
    • 3/4 tsp cornstarch
    • 1/3 cup water
    • 1 clove garlic, minced
    • 1 can (418g) creamed corn/cream style corn
    • 1/4 tsp chicken stock powder
    • 1 egg, beaten
  • Salt and black pepper to taste
  • Garnish (optional): sliced green onion

Directions:

  1. Rinse and pat dry the fish and slice it into 2 inch pieces. Set aside.
  2. Marinate the fish: In a bowl, mix together the salt, white pepper, cornstarch, and green onion. Add in the sliced fish and mix well, ensuring every piece is coated. Be careful not to break the fish when you mix. Set aside and let it marinate for 15 minutes at room temperature.
  3. Prepare the breading: Beat the eggs into a bowl and set aside. In another bowl, mix together the flour and cornstarch.
  4. Heat the oil in a small pot. Once the oil starts to shimmer or if it sizzles when you add in a bit of flour, it’s ready for frying.
  5. Bread and deep fry the fish: When the oil is nearly hot enough, start breading the fish. First coat the fish in the beaten egg (prepared in step 3), then coat it in the flour and cornstarch mixture. Gently drop the breaded fish pieces one at a time into the hot oil. Only add enough to not overcrowd the pot, roughly 6-7 pieces per batch. Move the pieces around, making sure they’re not sticking to each other and not sticking to the bottom of the pot. Cook for 5-7 minutes or until the outside is slightly browned. Use a slotted spoon to remove the fish from the oil and let it cool on a rack. Repeat this process until all of the fish is fried. Once all of the fish have been fried, fry them all a second time for 2 minutes per batch, starting from the most cooled batch first. This will make the fish extra crispy. Once finished, turn off the heat and set the fried fish aside on the cooling rack while you prepare the corn gravy.
  6. Make the corn gravy: In a small bowl, mix together the cornstarch and water, ensuring there are no lumps. Set aside. In a saucepan on MED heat, add a small drizzle of oil and sauté the garlic for 1 minute until fragrant. Add in the creamed corn, chicken stock powder, and the cornstarch/water mixture. Whisk everything well and let the sauce come to a boil. Turn the heat down and drizzle the beaten egg into the sauce. Slowly mix it around until the egg is cooked. You want swirls of cooked egg, so don’t over mix it. Once the egg has cooked, turn off the heat. Taste and adjust salt and black pepper to taste.
  7. Finishing touches: To serve, put the fried fish pieces onto a serving plate and pour the hot corn gravy over top. Garnish with sliced green onion. Serve immediately with a side of rice. Done!

Legit Tonkotsu Ramen from scratch (in an Instant Pot)


Date Published: Mar 3rd, 2024 | Last Updated: Mar 3rd, 2024
Author: Abby |Category: Asian, mains, soups
Serves: 4-6 | Prep time: 12 hours before to marinate | Cook time: 4.5 hours total

Jump to recipe |

A tonkotsu ramen is my all time favourite thing to eat, so I’m extra excited to be sharing this recipe with everyone! It’s a beautiful bowl of a rich pork bone broth with noodles, chashu, and a ramen egg. No matter what is happening in my life, a tonkotsu ramen will always make it better. When Toby and I travel, I’m always seeking out the local ramen spots – I must’ve had over a hundred bowls of ramen in my life time…so far.

I’ve always wanted to try making a tonkotsu ramen, however due to its long 12 hour cooking time, it’s complexities (ramen shops will use a refractometer to check their broth!), and having to source pork bones on the move, it has constantly been on the back burner. I’ve searched time and time again for a simplified recipe and even went as far as buying instant tonkotsu ramen to satisfy the cravings, but I’ve never succeeded in finding anything that was close to restaurant quality – until now! Recently I stumbled across a ramen subreddit where u/ramen_lord posted his version of a tonkotsu ramen but made in an Instant Pot in 3 hours (find original recipe here)! This made it much less intimidating for me and I decided to try it out. Amazingly, the recipe turned out near perfect the first time and after the second time, Toby said it was the best tonkotsu ramen he’s ever had. It was THAT good! If you’re ever reading this, thank you u/ramen_lord! (If you check out the original link, he also gives a recipe at making your own ramen noodles.)

Although it is a long recipe, each step and component is pretty easy and straightforward, so I’d encourage you to give it a try if you’re a ramen lover like me!

What Makes up a Tonkotsu Ramen?

A traditional tonkotsu ramen is made up of 6 major components, and yes, all of them are included in this very thorough monster recipe!

1. Chashu – pork belly slices

Chashu is a Japanese-style savoury pork belly that is braised the day before and marinated overnight. This is the main protein of the dish. Due to its fatty richness, it is usually served in thin slices and in small portions. This recipe will make about 2-3 slices per bowl. If you’re big on pork belly, then double the chashu portion of the recipe!

Note: Japanese chashu differs from the Chinese-style Charsiu which is barbecue pork rather than braised pork.

2. Ramen egg – a marinated boiled egg with a perfectly soft jammy centre

A ramen egg is a specific style of egg served in a bowl of ramen. It is always soft to medium-boiled to ensure a jammy velvety centre then marinated in a savoury sauce – I marinate mine in the chashu marinade overnight. Make sure you have a timer ready when you cook the eggs to ensure the perfect soft centre.

The ramen egg is always my favourite part of a bowl of ramen (my family would agree with me). For some reason, Toby is not a huge fan of eggs in general, so every time we go out for ramen he always gives me his egg! Lucky me 😊🙃❤️.

3. Tonkotsu broth – a rich and creamy pork bone broth

This is the star of the show. “Tonkotsu” literally translates to “pork bone”, which adequately names this ramen dish. The traditional method of making a tonkotsu broth is to boil the pork bones on high heat for 12 hours then add in aromatics. It is a long and arduous process which is why I’ve avoided making this recipe for so long. This recipe uses the Instant Pot pressure cooker to bring down the cook time to just 3 hours and produces restaurant-quality results!

A classic tonkotsu broth is creamy and rich due to the breakdown of the gelatin in the pork bones. Some recipes will blend pork fat and add it to the broth to make it even more creamy. For the sake of my cholesterol, there is no extra blended fat in this recipe. The broth here is just as good without it.

The colour of a tonkotsu broth should be opaque and milky white. Traditionally the pork bones are cleaned thoroughly by boiling them and removing the scum that is released and then scrubbing them clean before the broth is even started. Many purists out there will insist that you must clean the bones this way or else your broth will never be white. My first time making this recipe I cleaned the bones this way. Although it took extra time, it did produce a white broth. However after further research, I realized that you can also just roast the bones in the oven rather than scrubbing them clean and you still get the same results but with much less work. I tried it both ways and the results were quite similar. The oven roasting method produced a very slightly darker broth, however I’m sure that if I blended more of it in the blender, the results would be the same. Myth busted!

*Note: Tonkotsu is not to be confused with “tonkatsu” which is a breaded and fried pork cutlet

4. Tare – the flavour enhancer/salt of the dish

The tonkotsu broth alone lacks salt and umami flavour but when combined with the tare, it makes the perfect broth. Tare differs greatly between ramen shops and even between chefs. It can range from a simple mix of sauces to an incredibly complex recipe. It’s a chef’s signature to make a dish uniquely theirs. This recipe is a simplified version that’s essentially soy sauce marinated with mushrooms, seaweed, and dried fish.

5. Ramen noodles

Ramen noodles are different than regular noodles. They are alkaline and has a distinct taste with a slight chewy/bounce texture. To stay true to the authenticity of a tonkotsu ramen, I’d recommend taking the extra effort to find ramen noodles – you’re putting in all this effort to make it all from scratch anyway!

When looking for ramen noodles, try to buy them either freshly made or in the frozen section. Avoid the dehydrated dried noodles that are labeled as ‘ramen noodles’ – I’ve tried a few different kinds in the past and they’re just not the same.

My favourite ramen noodles are made from Sun Noodle and they come in medium or thick noodles (see picture). This one package has 2 servings – it doesn’t seem like much, but it definitely expands when cooking!

Myojo is another brand of ramen noodles I’ve heard good things about, but never tried myself.

6. Toppings

There is a wide variety of toppings you can add to your ramen. I’ve put some examples in the recipe below, but feel free to add in whatever you like. Different restaurants will have different offerings of what you can add – it all depends on personal preference. A few examples of toppings include: bean sprouts, corn, seaweed, sliced wood ear fungus, fresh garlic, chili paste, chopped green onion…etc.

Anyways, without further ado, here’s the recipe! If you have any comments or suggestions, I’d love to hear from you in the comment section! You can follow me on instagram, youtube and facebook to see all the recipes I post!

Happy cooking!

Equipment you’ll need:

  • Pressure cooker (at least 8 quarts in size)
  • Cooking twine
  • Small pot with lid/saucepan

Ingredients you’ll need:

  • Chashu (Pork Belly): MAKE THE DAY BEFORE
    • 500g (1.5lbs) pork belly with the skin on or off – this will be enough for 2-3 slices per portion. Feel free to double the chashu recipe if you want to serve more.
    • 1 cup water
    • 1/2 cup Japanese soy sauce (ie. Kikkoman)
    • 1/4 cup mirin
    • 2 Tbsps brown sugar
    • 2 garlic cloves, smashed
  • Ramen Egg: MAKE THE DAY BEFORE
    • 4-6 eggs (depending on how many people you’re serving)
  • Broth:
    • 1kg (2 lbs) pork neck bones (you want some meat to be attached to the bones for extra flavour)
    • 1kg (2 lbs) pork femur bones (make sure the larger leg bones are split so the bone marrow is exposed) – if you can’t find femur bones, you can use all neck bones
    • 12 cloves of garlic, peeled and smashed
    • 1 small brown onion, peeled and quartered
    • 4cm piece of ginger, sliced (don’t worry about peeling it)
    • 2 green onions, cut into thirds
  • Tare:
    • 1/2 cup (120ml) water
    • 1.5 Tbsps (25ml) mirin
    • 1 Tbsp (15ml) sake
    • 4g kombu (dried kelp)
    • 3g dried porcini mushrooms
    • 3g sababushi/dried mackerel, or katsuobushi/bonito flakes, or niboshi/dried anchovies – I had a difficulty sourcing these in my neighbourhood, so any of these will work to give it an umami fishy flavour
    • 1/2 cup (120ml) Japanese soy sauce (ie. Kikkoman)
    • 2.5 tsps (15g) kosher salt
    • 1.5 tsps (5g) brown sugar
  • 4-6 portions of ramen noodles, premade
  • Additional Toppings (optional):
    • Sliced green onion
    • Wood ear mushrooms
    • Seaweed
    • Bean sprouts

Directions:

THE DAY BEFORE:

A) Make the chashu:

Make sure the pork belly is at room temperature (take it out of the fridge at least 30mins prior).

Roll the pork belly into a cylinder with the layers visible on the side (see photo) and tie tightly with cooking twine so it stays in shape.

Take out a saucepan with a lid and add in the rest of the the chashu ingredients: water, soy sauce, mirin, brown sugar, garlic. Place the tied up pork belly in the middle of the saucepan.

Turn the heat on to HIGH and let the sauce come to a boil, then turn the heat down to LOW and let it simmer with the lid on for 90 minutes. Turn the pork belly every 20 minutes so it gets evenly braised in the sauce.

When there’s 20 minutes left to your cook time, preheat your oven to 220˚C (425˚F) and prepare a baking tray with a wire rack.

Once the 90 minutes is up, turn off the heat and take out the pork belly (keeping the remaining sauce aside) and place it on the rack over a baking tray and roast in the preheated oven for 8-10 minutes, or until the outside is a dark caramel colour.

When the pork belly is done, take it out of the oven and place it in a heat-proof container (make sure there’s enough room for the eggs as well). Pour the leftover sauce over and let the pork belly marinate in the sauce overnight. If the marinade doesn’t surround the pork belly, either use a smaller container or turn the pork belly halfway through for even marination. A vacuum-sealed plastic bag works well as well.

Vacuum-seal bags will help marinate it better by allowing the sauce to surround the meat and eggs

B) Make the ramen eggs: (you can do this step while you’re waiting for the pork belly to cook)

Bring a small pot of water to boil. Gently lower all 4 eggs into the boiling water and start a timer for 7 minutes. Adjust the heat if the water is boiling too rapidly to avoid the eggs from knocking around in the pot.

While you’re waiting, prepare an ice bath for the eggs. Once the timer is up, turn off the heat and immediately submerge all the eggs into the ice bath. Once the eggs are cool enough to handle, remove all of the shells.

Place the peeled boiled eggs into the same container as the pork belly and marinate together overnight. If the sauce does not surround the egg, turn the eggs halfway through for even marination. A vacuum-sealed plastic bag works well as well. Do not marinate for longer than 2-3 days or else the egg will become too salty.

THE DAY OF:

C) Make the tonkotsu broth:

Preheat oven to 220˚C (425˚F)

Roast the bones: Prepare a large lined baking tray. Rinse the pork bones and place them all in one layer of the tray (do not overlap the bones). Use a second tray if they don’t all fit into one. Roast in the preheated oven for 40 minutes, turning the bones once halfway through the cook time. After 40 minutes, turn off the oven. You should have a dark brown char on the bones.

Cook the broth: Place the roasted bones along with any browned bits or liquids from the tray (these will add extra flavour) into your Instant Pot. Add enough water to cover the bones by 2-3cm (roughly 3 litres). Turn the Instant Pot on to a sauté setting and set the heat to HIGH. Once the water comes to a boil, cancel the setting and put the lid on. Turn on the pressure cook setting to HIGH and cook for 2 hours. (You can start making the tare or prepare any additional toppings during this time as you wait.) When the timer finishes, quick release the pressure – be careful of any spurting of liquids from the vent! When it is safe to do so, remove the lid carefully.

Add in aromatics & free the bone marrow: Add in garlic, ginger, green onion and onion into the broth. Use a chopstick and scrape out any bone marrow from the bones and let the marrow boil freely in the soup alongside the bones.

Boiling the broth for the final hour – lid on or lid off will depend on how rich it is after the Instant Pot

Taste for richness and Reduce (if needed): At this point the broth will taste quite bland since there as been no added salt and the aromatics were just introduced. Ignore the need to want to add in salt right now – it will come later. You want to taste for the texture of the broth, not the flavour. How creamy your broth is at this stage will dictate how you cook down your broth (the texture will vary greatly depending on the mix of bones you started with – it varies every time I make it):

If your broth is watery: turn on the sauté setting on the Instant Pot and set to MED heat so the soup boils moderately. Let it boil uncovered for 1 hour to reduce the broth and increase in concentration/richness. Taste at the end of 1 hour – you can let it boil for longer if needed.

If your broth is rich & creamy: add a lid on to the Instant Pot (or transfer to a regular soup pot with a lid) and let the soup boil on MED heat for 1 hour to release the flavour of the aromatics but to still contain all the liquid.

You will need to boil the broth for 1 hour regardless of how rich your broth is. The difference is whether you keep the lid on or off to control how much liquid is evaporated. If you’re unsure, then start boiling without a lid, then taste after 30 minutes, or have the lid half-on so it only reduces slightly. Once your broth is rich enough then put the lid on and finish boiling until the 1 hour timer is up.

Strain: After an hour, turn off the heat and strain the broth into a clean pot. Discard the bones, aromatics, and any floaters that you have strained out. You should now have a pale brown opaque broth. Do not worry if your broth is not a lighter colour – it will lighten up in the next step.

Blend – the magic step that makes the broth extra creamy and white: Remove roughly a quarter of the amount of broth into a blender and blend it on HIGH until you get a very smooth, white, and creamy texture. Add this back into the rest of the broth and mix well. Taste again for the texture.

If you find that it is too creamy, add hot water a cup at a time until desired consistency.

If you want it creamer and whiter, add more broth into the blender and blend again on HIGH and add it back into the broth until desired consistency.

Resist the urge to add salt – the final taste test will be at the end with the combination of the tare (salty goodness) with with broth together. The tonkotsu broth is now complete! If you still need more time to prepare the rest of the toppings or tare, then keep the soup on low heat to keep it hot until ready to serve.

D) Make the tare: (do this while you’re waiting for the broth to cook)

In a small pan, add the water, mirin, sake, kombu, porcini, and sababushi. Turn the heat on to HIGH. When it starts to boil, turn the heat off and let it steep for 30 minutes.

After 30 minutes, remove the kombu, add in the soy sauce, salt, sugar, and MSG. Whisk until dissolved. Turn the heat back on to HIGH until it starts to boil, then turn it off again and let it steep for at least 30 minutes. Strain before using. You can store this in the fridge for up to 6 months.

E) Cook the noodles, prepare the rest of the toppings: (you can do this in the final 10-15 minutes of your broth cooking)

Chashu and ramen egg: Remove the twine from the chashu and thinly slice it while still chilled (it will be easier to get neater cuts). Cut each egg in half to reveal the jammy egg yolk centre. Set aside.

Noodles: Cook the noodles according to package instructions and strain when finished.

Wood ear mushrooms: Soak the wood ear mushrooms in a bowl of boiling hot water for at least 15 minutes or until softened and expanded. Remove from the water, rinse, and slice. Set aside.

Green onion: Thinly slice one green onion for garnish. Set aside.

Seaweed: Cut your seaweed to desired sizes for serving.

F) Assemble the ramen: (finally!)

Divide the noodles equally into the serving bowls if not done so already.

Add 2 ladles of the tonkotsu broth over the noodles. Top with sliced chashu, ramen egg, wood ear mushrooms, seaweed, and green onion to garnish. Add a 3 tablespoons of tare over top (or more if you prefer it saltier). ENJOY!

Summarized Recipe:

Legit Tonkotsu Ramen from scratch (in an Instant Pot)

Date Published: Mar 3rd, 2024 | Last Updated: Mar 3rd, 2024
Author: Abby |Category: Asian, mains, soups
Serves: 4-6 | Prep time: 12 hours before to marinate | Cook time: 4.5 hours total

Equipment you’ll need:

  • Pressure cooker (at least 8 quarts in size)
  • Cooking twine
  • Small pot with lid/saucepan

Ingredients you’ll need:

  • Chashu (Pork Belly): MAKE THE DAY BEFORE
    • 500g (1.5lbs) pork belly with the skin on or off – this will be enough for 2-3 slices per portion. Feel free to double the chashu recipe if you want to serve more.
    • 1 cup water
    • 1/2 cup Japanese soy sauce (ie. Kikkoman)
    • 1/4 cup mirin
    • 2 Tbsps brown sugar
    • 2 garlic cloves, smashed
  • Ramen Egg: MAKE THE DAY BEFORE
    • 4-6 eggs (depending on how many people you’re serving)
  • Broth:
    • 1kg (2 lbs) pork neck bones (you want some meat to be attached to the bones for extra flavour)
    • 1kg (2 lbs) pork femur bones (make sure the larger leg bones are split so the bone marrow is exposed) – if you can’t find femur bones, you can use all neck bones
    • 12 cloves of garlic, peeled and smashed
    • 1 small brown onion, peeled and quartered
    • 4cm piece of ginger, sliced (don’t worry about peeling it)
    • 2 green onions, cut into thirds
  • Tare:
    • 1/2 cup (120ml) water
    • 1.5 Tbsps (25ml) mirin
    • 1 Tbsp (15ml) sake
    • 4g kombu (dried kelp)
    • 3g dried porcini mushrooms
    • 3g sababushi/dried mackerel, or katsuobushi/bonito flakes, or niboshi/dried anchovies – I had a difficulty sourcing these in my neighbourhood, so any of these will work to give it an umami fishy flavour
    • 1/2 cup (120ml) Japanese soy sauce (ie. Kikkoman)
    • 2.5 tsps (15g) kosher salt
    • 1.5 tsps (5g) brown sugar
  • 4-6 portions of ramen noodles, premade
  • Additional Toppings (optional):
    • Sliced green onion
    • Wood ear mushrooms
    • Seaweed
    • Bean sprouts

Directions:

THE DAY BEFORE:

  • A) Make the chashu:
    1. Make sure the pork belly is at room temperature (take it out of the fridge at least 30mins prior).
    2. Roll the pork belly into a cylinder with the layers visible on the side (see photo) and tie tightly with cooking twine so it stays in shape.
    3. Take out a saucepan with a lid and add in the rest of the the chashu ingredients: water, soy sauce, mirin, brown sugar, garlic. Place the tied up pork belly in the middle of the saucepan.
    4. Turn the heat on to HIGH and let the sauce come to a boil, then turn the heat down to LOW and let it simmer with the lid on for 90 minutes. Turn the pork belly every 20 minutes so it gets evenly braised in the sauce.
    5. When there’s 20 minutes left to your cook time, preheat your oven to 220˚C (425˚F) and prepare a baking tray with a wire rack.
    6. Once the 90 minutes is up, turn off the heat and take out the pork belly (keeping the remaining sauce aside) and place it on the rack over a baking tray and roast in the preheated oven for 8-10 minutes, or until the outside is a dark caramel colour. When the pork belly is done, take it out of the oven and place it in a heat-proof container (make sure there’s enough room for the eggs as well). Pour the leftover sauce over and let the pork belly marinate in the sauce overnight. If the marinade doesn’t surround the pork belly, either use a smaller container or turn the pork belly halfway through for even marination. A vacuum-sealed plastic bag works well as well.
  • B) Make the ramen eggs: (you can do this step while you’re waiting for the pork belly to cook)
    1. Bring a small pot of water to boil. Gently lower all 4 eggs into the boiling water and start a timer for 7 minutes. Adjust the heat if the water is boiling too rapidly to avoid the eggs from knocking around in the pot.
    2. While you’re waiting, prepare an ice bath for the eggs. Once the timer is up, turn off the heat and immediately submerge all the eggs into the ice bath. Once the eggs are cool enough to handle, remove all of the shells.
    3. Place the peeled boiled eggs into the same container as the pork belly and marinate together overnight. If the sauce does not surround the egg, turn the eggs halfway through for even marination. A vacuum-sealed plastic bag works well as well. Do not marinate for longer than 2-3 days or else the egg will become too salty.

THE DAY OF:

  • C) Make the tonkotsu broth:
    1. Preheat oven to 220˚C (425˚F)
    2. Roast the bones: Prepare a large lined baking tray. Rinse the pork bones and place them all in one layer of the tray (do not overlap the bones). Use a second tray if they don’t all fit into one. Roast in the preheated oven for 40 minutes, turning the bones once halfway through the cook time. After 40 minutes, turn off the oven. You should have a dark brown char on the bones.
    3. Cook the broth: Place the roasted bones along with any browned bits or liquids from the tray (these will add extra flavour) into your Instant Pot. Add enough water to cover the bones by 2-3cm (roughly 3 litres). Turn the Instant Pot on to a sauté setting and set the heat to HIGH. Once the water comes to a boil, cancel the setting and put the lid on. Turn on the pressure cook setting to HIGH and cook for 2 hours. (You can start making the tare or prepare any additional toppings during this time as you wait.) When the timer finishes, quick release the pressure – be careful of any spurting of liquids from the vent! When it is safe to do so, remove the lid carefully.
    4. Add in aromatics & free the bone marrow: Add in garlic, ginger, green onion and onion into the broth. Use a chopstick and scrape out any bone marrow from the bones and let the marrow boil freely in the soup alongside the bones.
    5. Taste for richness and Reduce (if needed): At this point the broth will taste quite bland since there as been no added salt and the aromatics were just introduced. Ignore the need to want to add in salt right now – it will come later. You want to taste for the texture of the broth, not the flavour. How creamy your broth is at this stage will dictate how you cook down your broth (the texture will vary greatly depending on the mix of bones you started with – it varies every time I make it):
      • If your broth is watery: turn on the sauté setting on the Instant Pot and set to MED heat so the soup boils moderately. Let it boil uncovered for 1 hour to reduce the broth and increase in concentration/richness. Taste at the end of 1 hour – you can let it boil for longer if needed.
      • If your broth is rich & creamy: add a lid on to the Instant Pot (or transfer to a regular soup pot with a lid) and let the soup boil on MED heat for 1 hour to release the flavour of the aromatics but to still contain all the liquid.
      • You will need to boil the broth for 1 hour regardless of how rich your broth is. The difference is whether you keep the lid on or off to control how much liquid is evaporated. If you’re unsure, then start boiling without a lid, then taste after 30 minutes, or have the lid half-on so it only reduces slightly. Once your broth is rich enough then put the lid on and finish boiling until the 1 hour timer is up.
    6. Strain: After an hour, turn off the heat and strain the broth into a clean pot. Discard the bones, aromatics, and any floaters that you have strained out. You should now have a pale brown opaque broth. Do not worry if your broth is not a lighter colour – it will lighten up in the next step.
    7. Blend – the magic step that makes the broth extra creamy and white: Remove roughly a quarter of the amount of broth into a blender and blend it on HIGH until you get a very smooth, white, and creamy texture. Add this back into the rest of the broth and mix well. Taste again for the texture.
      • If you find that it is too creamy, add hot water a cup at a time until desired consistency.
      • If you want it creamer and whiter, add more broth into the blender and blend again on HIGH and add it back into the broth until desired consistency.
      • Resist the urge to add salt – the final taste test will be at the end with the combination of the tare (salty goodness) with with broth together. The tonkotsu broth is now complete! If you still need more time to prepare the rest of the toppings or tare, then keep the soup on low heat to keep it hot until ready to serve.
  • D) Make the tare: (do this while you’re waiting for the broth to cook)
    1. In a small pan, add the water, mirin, sake, kombu, porcini, and sababushi. Turn the heat on to HIGH. When it starts to boil, turn the heat off and let it steep for 30 minutes.
    2. After 30 minutes, remove the kombu, add in the soy sauce, salt, sugar, and MSG. Whisk until dissolved. Turn the heat back on to HIGH until it starts to boil, then turn it off again and let it steep for at least 30 minutes. Strain before using. You can store this in the fridge for up to 6 months.
  • E) Cook the noodles, prepare the rest of the toppings: (you can do this in the final 10-15 minutes of your broth cooking)
    1. Chashu and ramen egg: Remove the twine from the chashu and thinly slice it while still chilled (it will be easier to get neater cuts). Cut each egg in half to reveal the jammy egg yolk centre. Set aside.
    2. Wood ear mushrooms: Soak the wood ear mushrooms in a bowl of boiling hot water for at least 15 minutes or until softened and expanded. Remove from the water, rinse, and slice. Set aside.
    3. Noodles: Cook the noodles according to package instructions, strain, and even divide into serving bowls.
    4. Green onion: Thinly slice one green onion for garnish. Set aside.
    5. Seaweed: Cut your seaweed to desired sizes for serving.
  • F) Assemble the ramen: (finally!)
    1. Divide the noodles equally into the serving bowls if not done so already.
    2. Add 2 ladles of the tonkotsu broth over the noodles.
    3. Top with sliced chashu, ramen egg, wood ear mushrooms, seaweed, and green onion to garnish. Add a 3 tablespoons of tare over top (or more if you prefer it saltier). ENJOY!