Date Published: July 24th, 2020 | Last Updated: July 24th, 2020
Author: Abby |Category: sauces/dips, easy, < 15mins, snacks, vegetarian, healthy
Serves: 1 large bowl | Prep time: 10 mins | Cook time: 5 mins (not including refrigeration)
Jump to recipe |
I love guacamole. LOVE. Seriously. The creaminess of the avocados with the freshness of the tomatoes and lime juice is pure happiness in a bowl. I could easily devour a whole bowl of it myself while binge-watching something. It’s quick and easy with no actual cooking required – just chop some ingredients and mix it all up. Try to make it a little ahead of time because it tastes so much better after a few hours in the fridge to let the flavours infuse. Trust me.
Avocados are quite fatty by nature so the bad news is that the calories tend to stack up when you have too much. However the good news is that it’s good fat and has numerous health benefits so it’s actually quite good for you (as long as you don’t pair it with too many chips 😅).

My favourite way to eat guacamole is to simply have it as a dip served with tortilla chips. It’s a simple, quick and filling snack – but of course it goes amazingly on so many other things such as nachos, fajitas, tacos, burritos…etc.
I think my guacamole obsession started back in my university years in Canada with my old roommate Taryn. We’d frequently go to Gryph’s Sports Lounge/Campus Bar above the hockey rink and always order nachos with a side of guacamole. I don’t know what they put in their nachos, but it was so simple and satisfying. No fancy meats or sauces – just good ol’ nachos, cheese, sour cream, salsa and guacamole. Even after we graduated we met up a couple times at Gryph’s just to get the nachos and catch up (although from memory the last time we went there they had changed their nachos 😞).
Anyways, without further ado, here’s the recipe!
Happy Cooking!
Ingredients you’ll need:
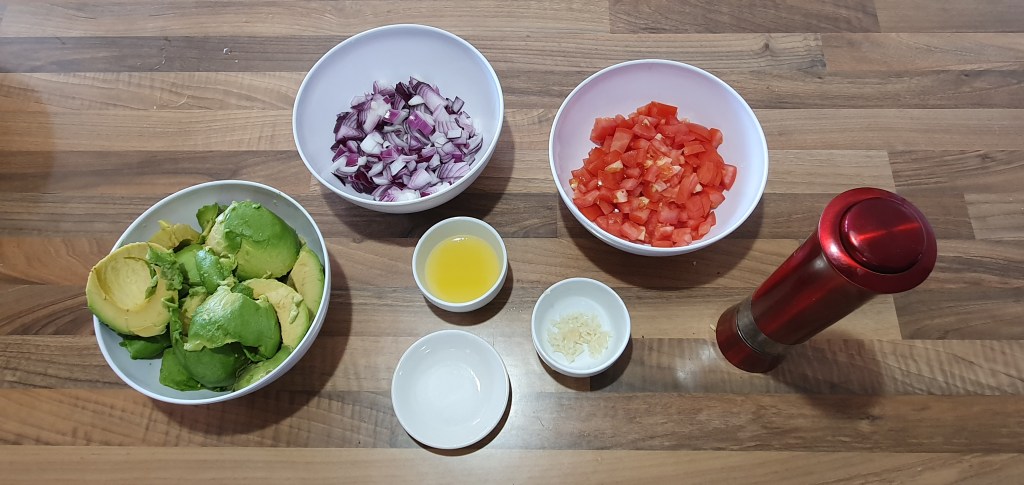
- 3 large hass avocados – a tip on how to choose avocados: gently squeeze them. You want them to be firm but with a slight give. If they squeeze in too much then they’re over ripe. If you don’t plan on using them for a while, then buy them more firm and leave it out on your counter to ripen. Hass avocados work best in guacamole.
- 1 clove garlic, minced
- 2 cups tomatoes, diced (~2 tomatoes)
- 1 1/2 cups red onion (~1 medium onion), diced – you can use regular yellow onions instead but the red ones give a bit more sweetness
- 1 Tbsp lime juice (or more to taste) – different limes will have different sourness, so taste as you go and add more if you need (if you accidentally go overboard, add some sugar or more salt)
- 1/2 tsp salt (or more to taste) – salt enhances the flavour of the ingredients. If you’re not sure whether you need more salt, I’d recommend letting the guacamole sit in the fridge for an hour after the flavours marinate together and then taste it to adjust flavours
- 1/2 tsp fresh ground black pepper (or more to taste)
- 1 pinch ground cayenne pepper (optional for a bit of heat)
- Optional: chopped cilantro/coriander
Directions:

Peel, pit and mash the avocados in a large bowl. I find it easiest to mash avocados by using a whisk as a masher. If you prefer your guac more chunky, stop mashing when you get to your desired consistency.
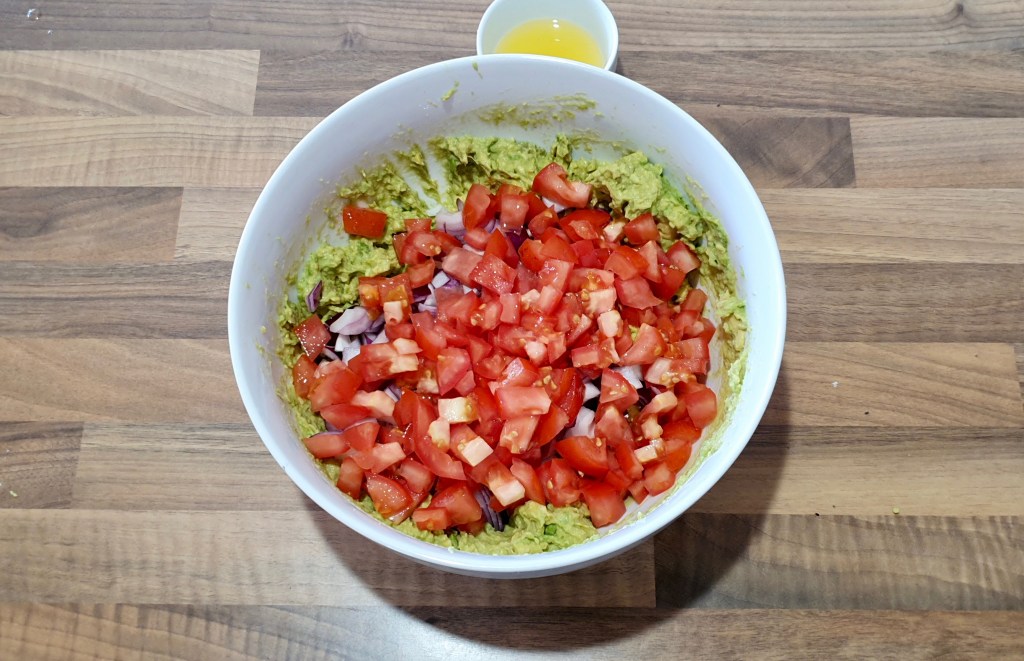
Mix in the rest of the ingredients to the mashed avocados (garlic, tomatoes, onion, lime juice, salt, pepper). Taste and adjust ingredients as needed. I find that different limes have different degrees of sourness, so start with a small amount (like half a tbsp) and then add more as needed – I’ve had to add up to 2 Tbsps of juice before. It’s better to start with a small amount rather than overdo it. If you’re having some trouble adjusting the flavours, you can let it chill for a few hours first to let the flavours blend together and season it afterwards.

Ideally refrigerate for at least 1 hour before serving (overnight is better) to let the flavours marinate together, then taste and adjust ingredients as needed. The difference between letting it chill in the fridge for a few hours or overnight vs serving it right away is night and day. Trust me.

Enjoy! Serve on the side of burritos, fajitas, nachos, or even just with some chips and crackers as a snack.
If you have any comments or suggestions, I’d love to hear from you in the comment section! You can follow me on instagram, youtube and facebook to see all the recipes I post!
Summarized Recipe:
Guacamole
Date Published: July 24th, 2020 | Last Updated: July 24th, 2020
Author: Abby |Category: sauces/dips, easy, < 15mins, snacks, vegetarian, healthy
Serves: 1 large bowl | Prep time: 10 mins | Cook time: 5 mins (not including refrigeration)
Ingredients:
- 3 large hass avocados
- 1 clove garlic, minced
- 2 cups tomatoes, diced (~2 tomatoes)
- 1 1/2 cups red onion, diced
- 1 Tbsp lime juice (or more to taste)
- 1/2 teaspoon salt (or more to taste)
- 1/2 tsp ground black pepper (or more to taste)
- 1 pinch ground cayenne pepper (optional)
- Optional: chopped cilantro/coriander
Directions:
- Peel, pit and mash the avocados in a large bowl.
- Mix in the rest of the ingredients (garlic, tomatoes, onion, lime juice, salt, pepper). Taste and adjust ingredients as needed.
- Ideally refrigerate for 1 hour before serving to let the flavours marinate together then taste and adjust flavours again as needed.